 Qazi Forex Tips

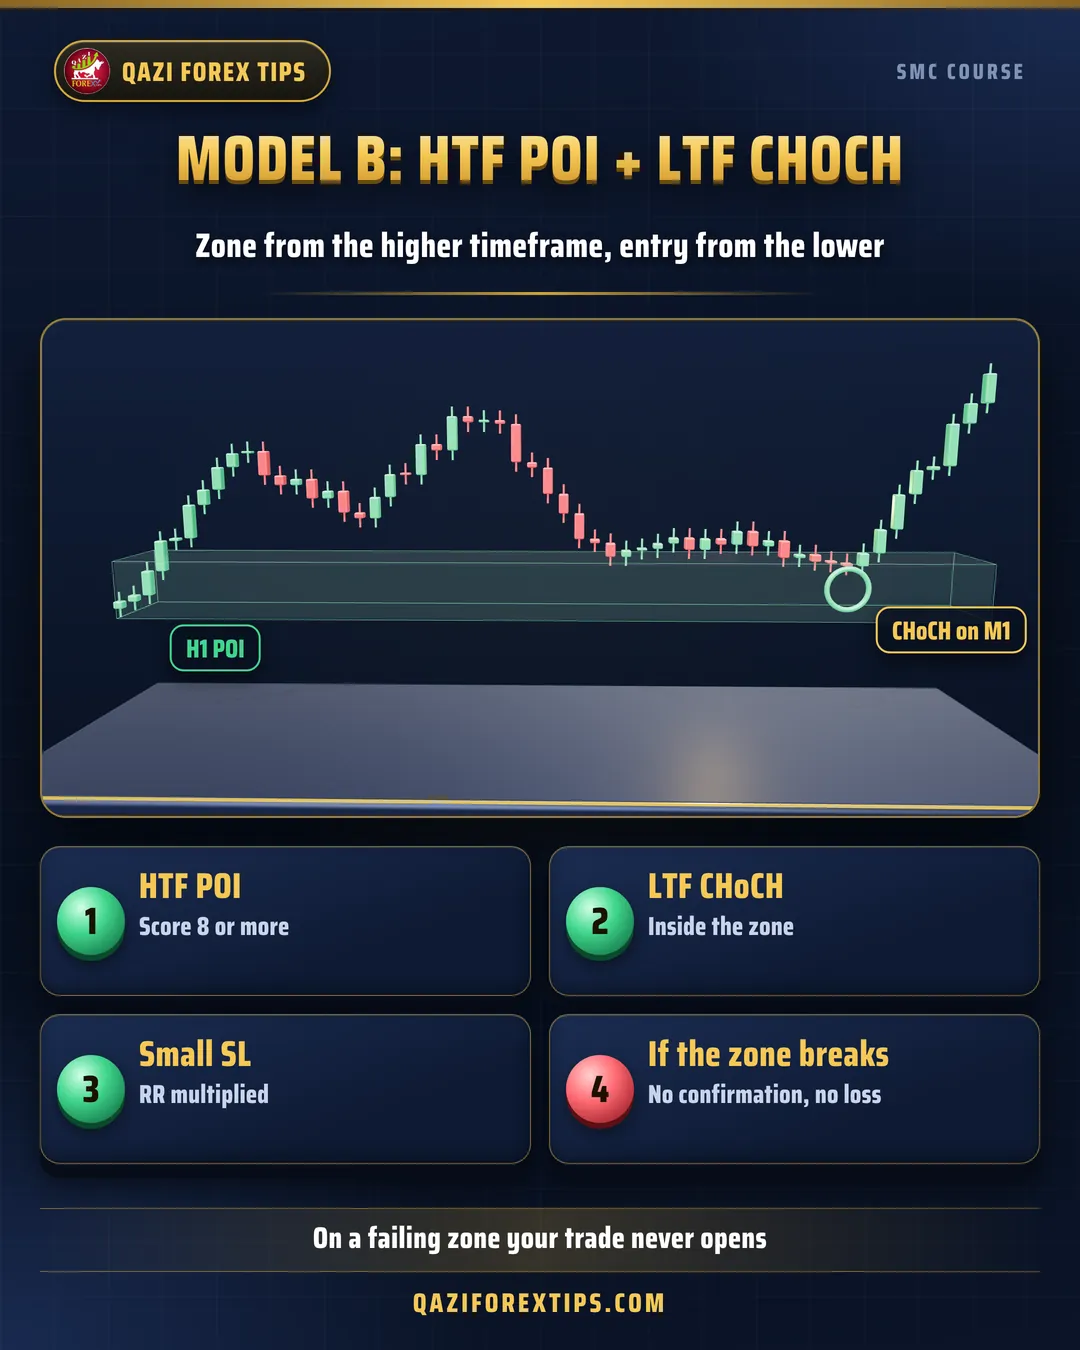
The idea of model B
A higher timeframe POI is strong but also wide. If an H1 order block is $10 tall and your stop sits behind it, the RR stays weak. Model B says: the zone from the higher timeframe, the entry from the lower timeframe. When price reaches the HTF POI, wait for a CHoCH on the LTF and enter from the small POI that forms after it. The stop shrinks and the RR multiplies.
Timeframe pairs
| HTF POI | LTF confirmation | Style |
|---|---|---|
| H4 | M15 | Swing and intraday |
| H1 | M5 or M1 | Intraday (best for Gold) |
| M15 | M1 | Scalping |
Rule: the LTF is usually 10 to 15 times smaller than the HTF.
Step by step
- HTF POI: mark an H1 POI scoring 8 or more (order block, FVG, breaker), in the bias direction and on the right side of discount or premium.
- Wait: alert at the zone edge. Nothing until price is inside.
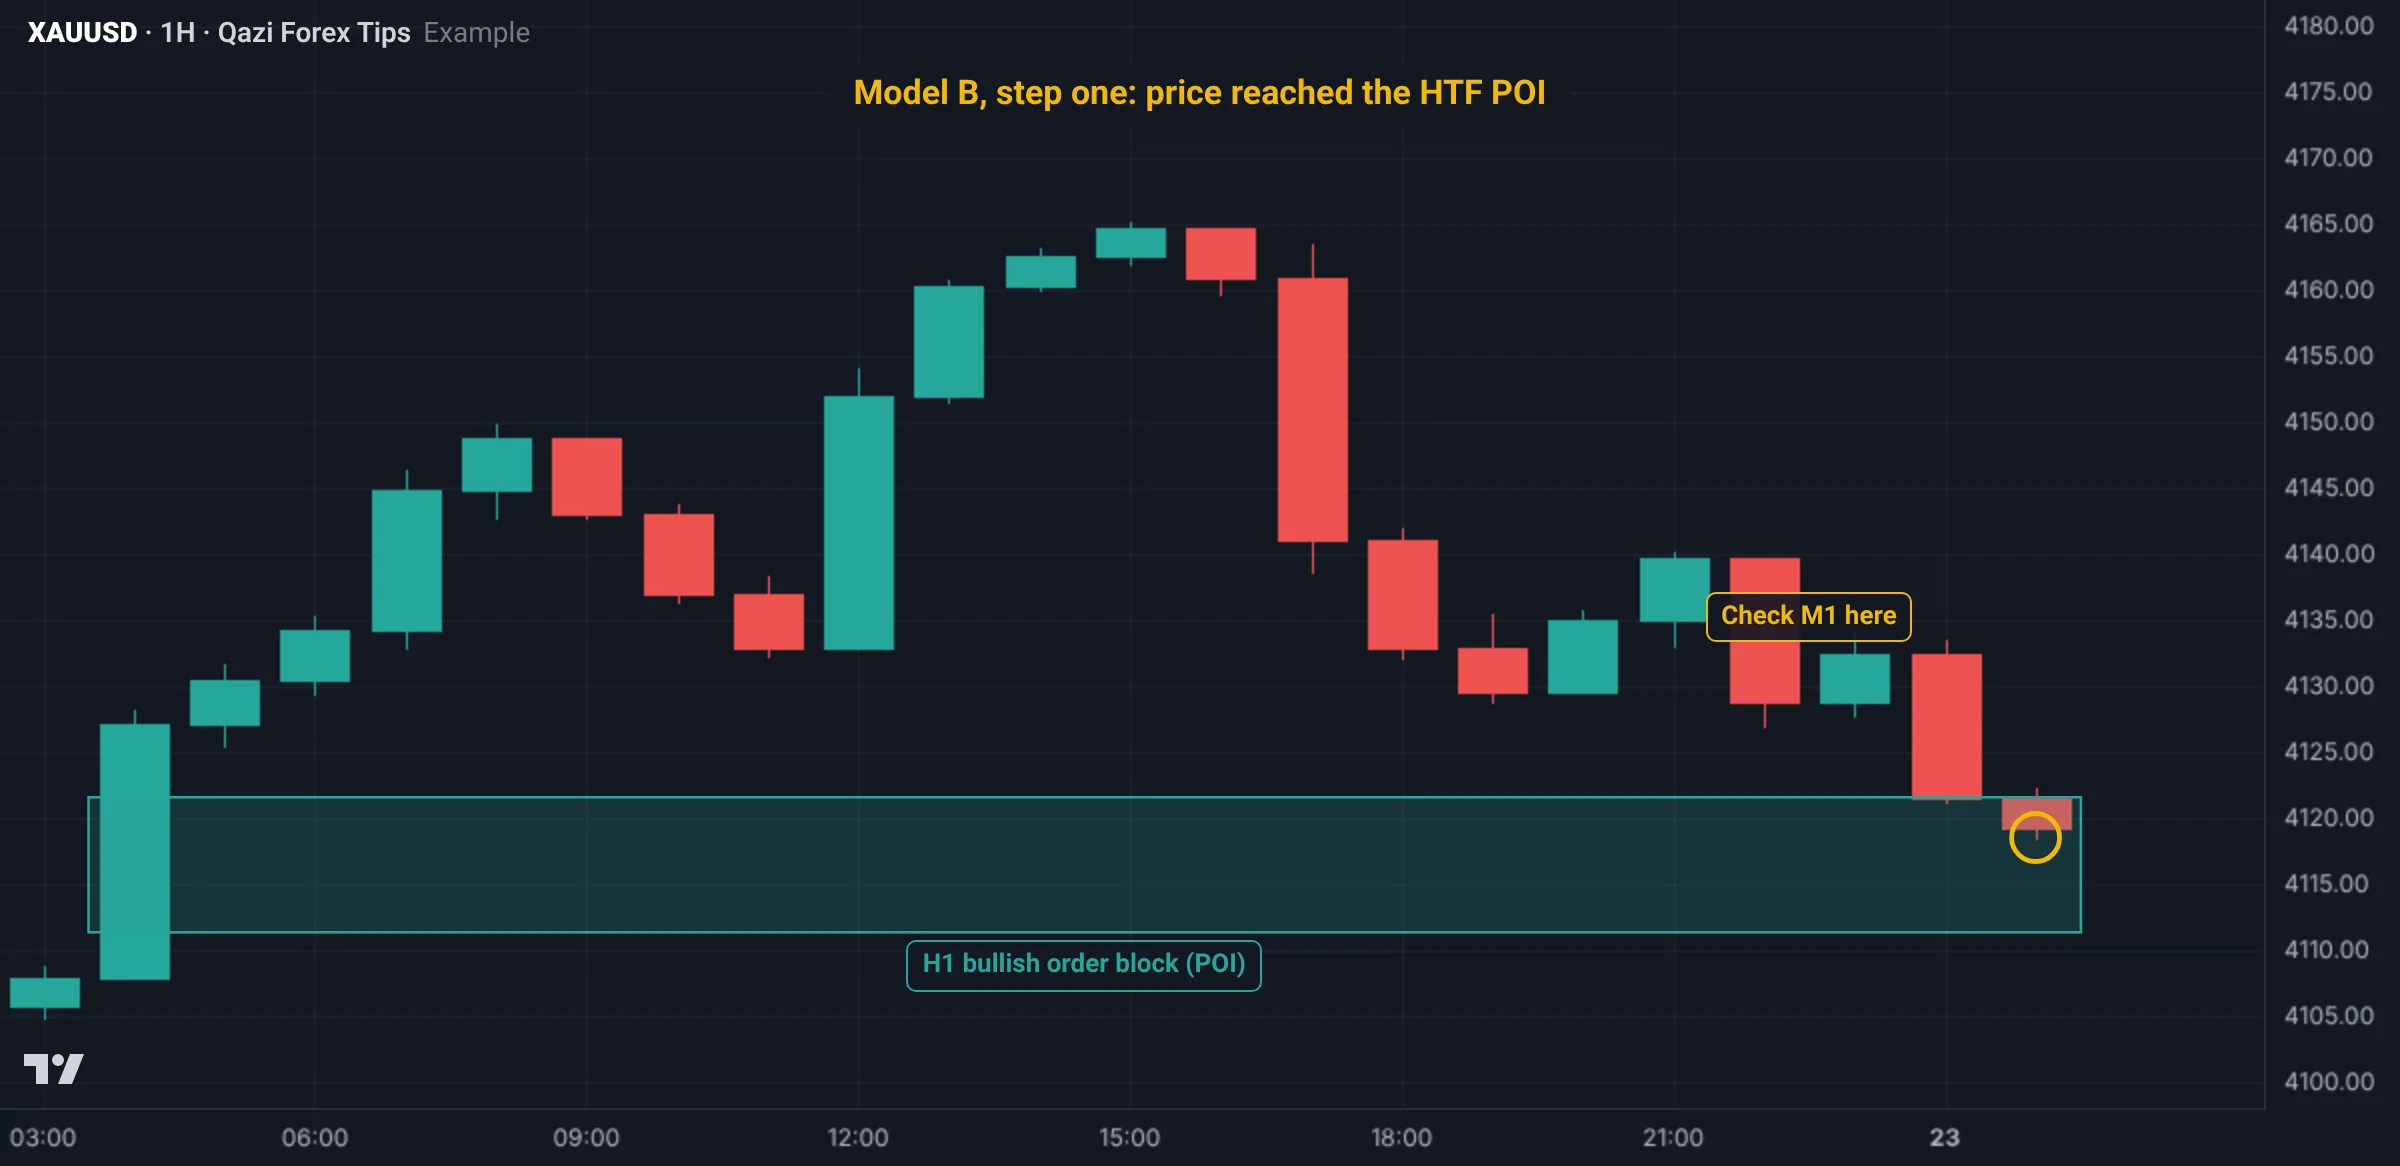
- LTF downtrend: as price enters the zone, M1 is printing LHs and LLs. Mark the last LH.
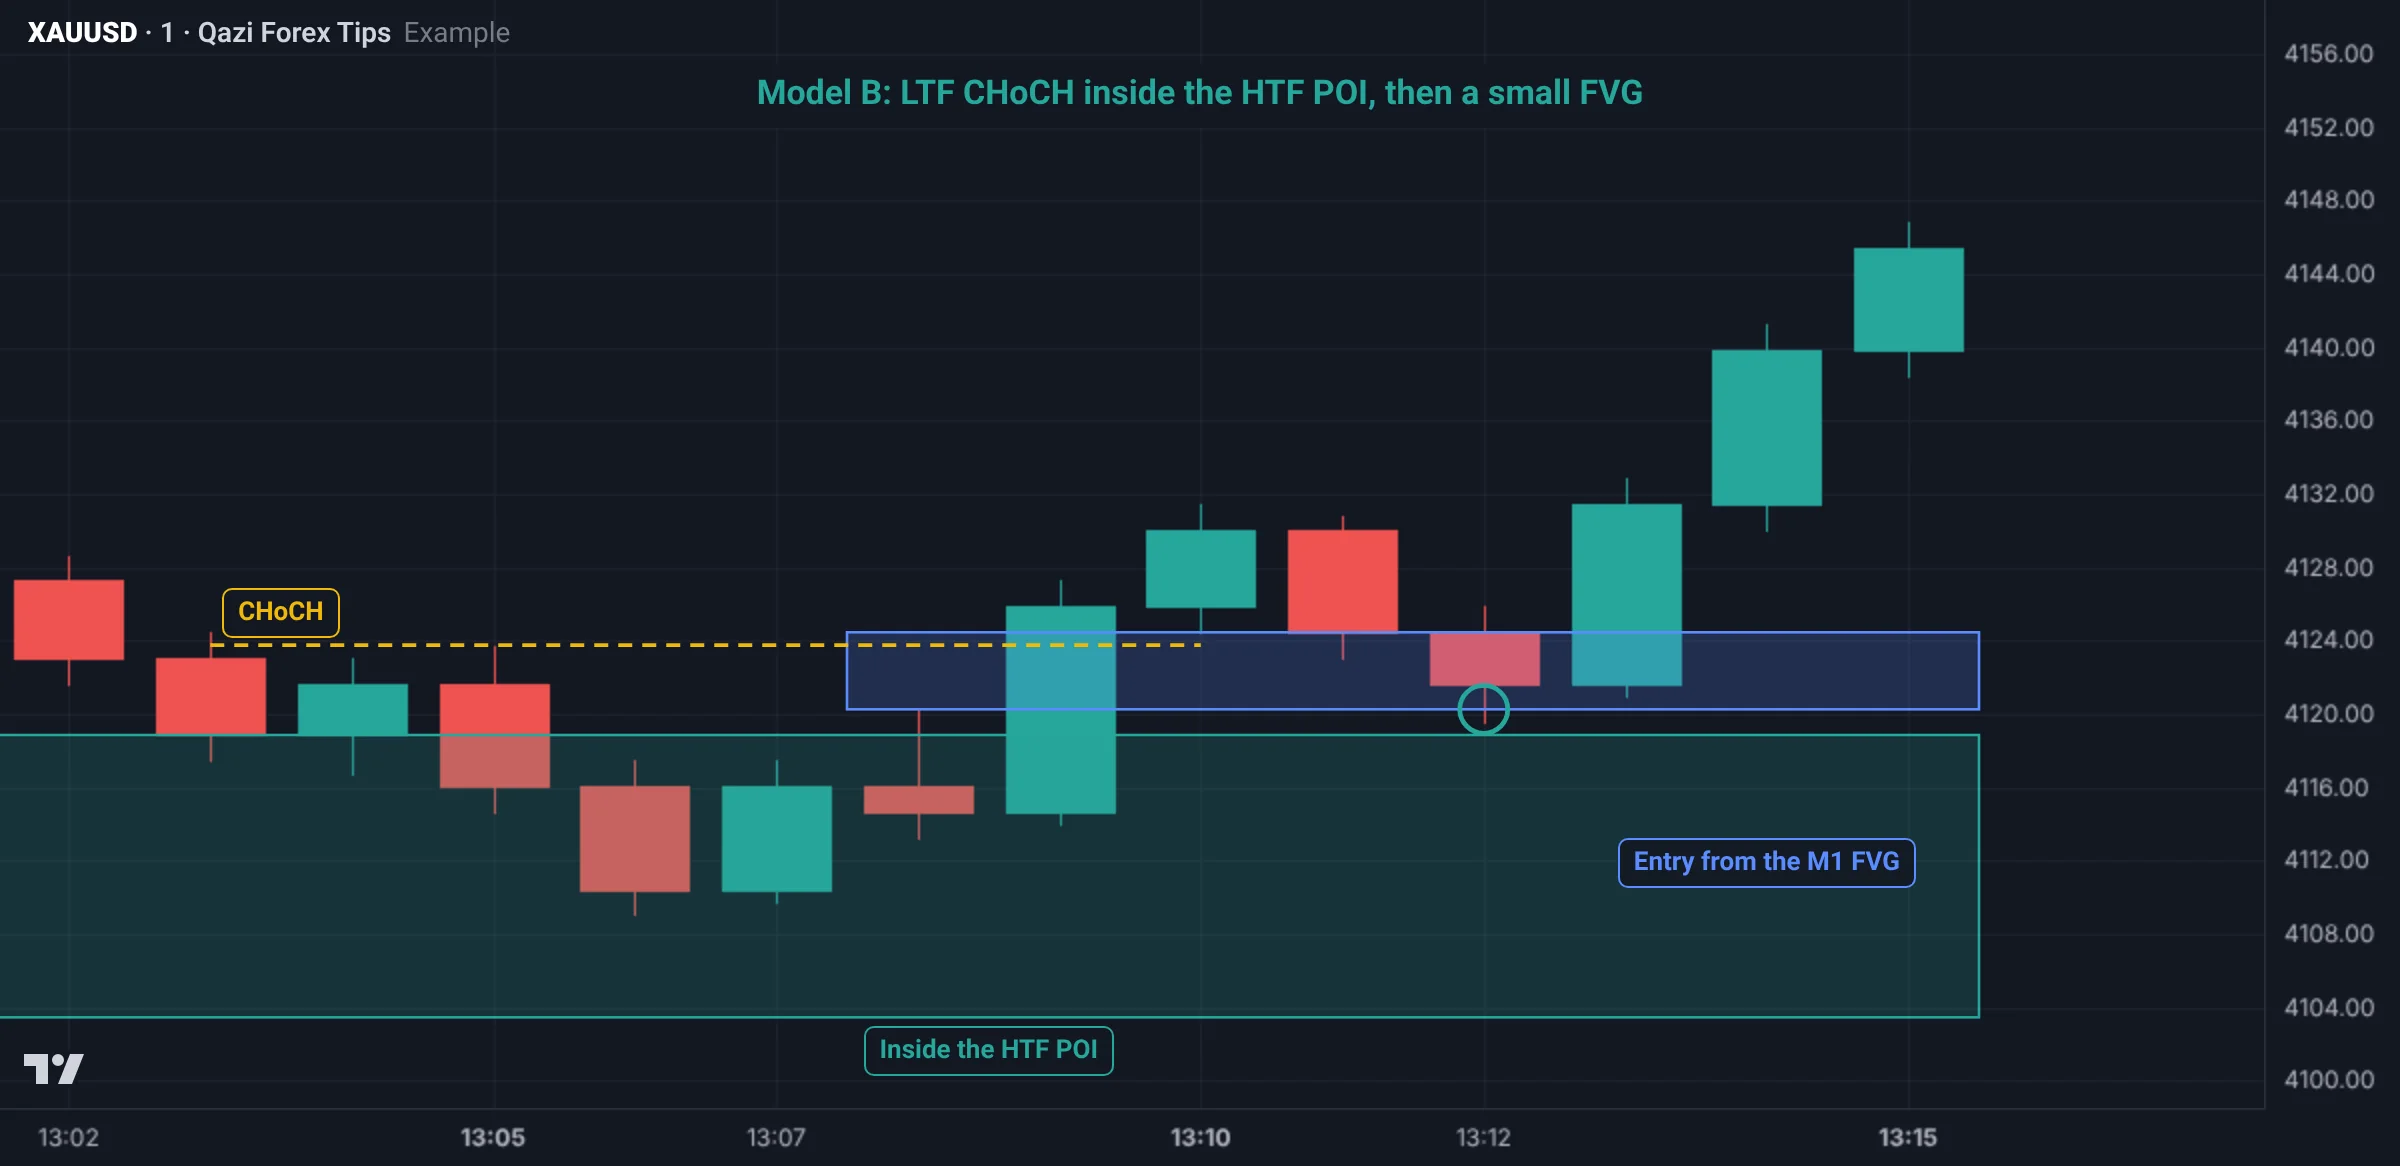
- CHoCH: a candle closes its body above that last LH. Ideally a small sweep inside the zone comes first.
- LTF POI: mark the FVG or order block of the CHoCH move.
- Entry: when price returns into that LTF POI.
- SL: below the low before the CHoCH (inside the zone). TP: the higher timeframe draw on liquidity.
The RR difference
| Method | Entry | SL | Risk | To target 4,150 | RR |
|---|---|---|---|---|---|
| Direct limit on the H1 OB | 4,124 | 4,112 | 12 | 26 | 1:2.2 |
| Model B (after an M1 CHoCH) | 4,120 | 4,116 | 4 | 30 | 1:7.5 |
Model B misses some trades (when price turns without LTF confirmation), but the ones it takes have far better RR.
Model B vs model A
| Point | Model A | Model B |
|---|---|---|
| Starts with | A liquidity sweep | Price reaching an HTF POI |
| Key | Sweep and MSS | Zone quality and LTF CHoCH |
| Most common | Reversals at session opens | Pullbacks in a trend |
| SL | Beyond the sweep | Beyond the LTF low inside the zone |
The best trades often combine both: price reaches the HTF POI, sweeps a low there, then prints an LTF MSS and FVG.
Gold example
Thursday, winter. H4 bullish, DOL at the equal highs at 4,150.
- H1 POI: bullish order block 4,112 to 4,124, in discount and the OTE, score 9/10. Alert at 4,125.
- London killzone: price entered the zone. M1 shows LHs and LLs; last LH 4,121.
- Price dipped to 4,115 (a small sweep inside the zone), then an M1 candle closed above 4,121: CHoCH.
- The CHoCH move left an FVG from 4,119 to 4,122.
- Price returned to 4,120. Entry 4,120, SL 4,114, risk $6.
- TP: 4,150, $30: 1:5. At 1% of $1,000: 10 ÷ (6 × 100) = 0.016, so 0.01 lot.
Real Gold chart examples
Gold M15 on 3 and 4 Nov 2026 (data: Dukascopy, bid price; Pakistan time):
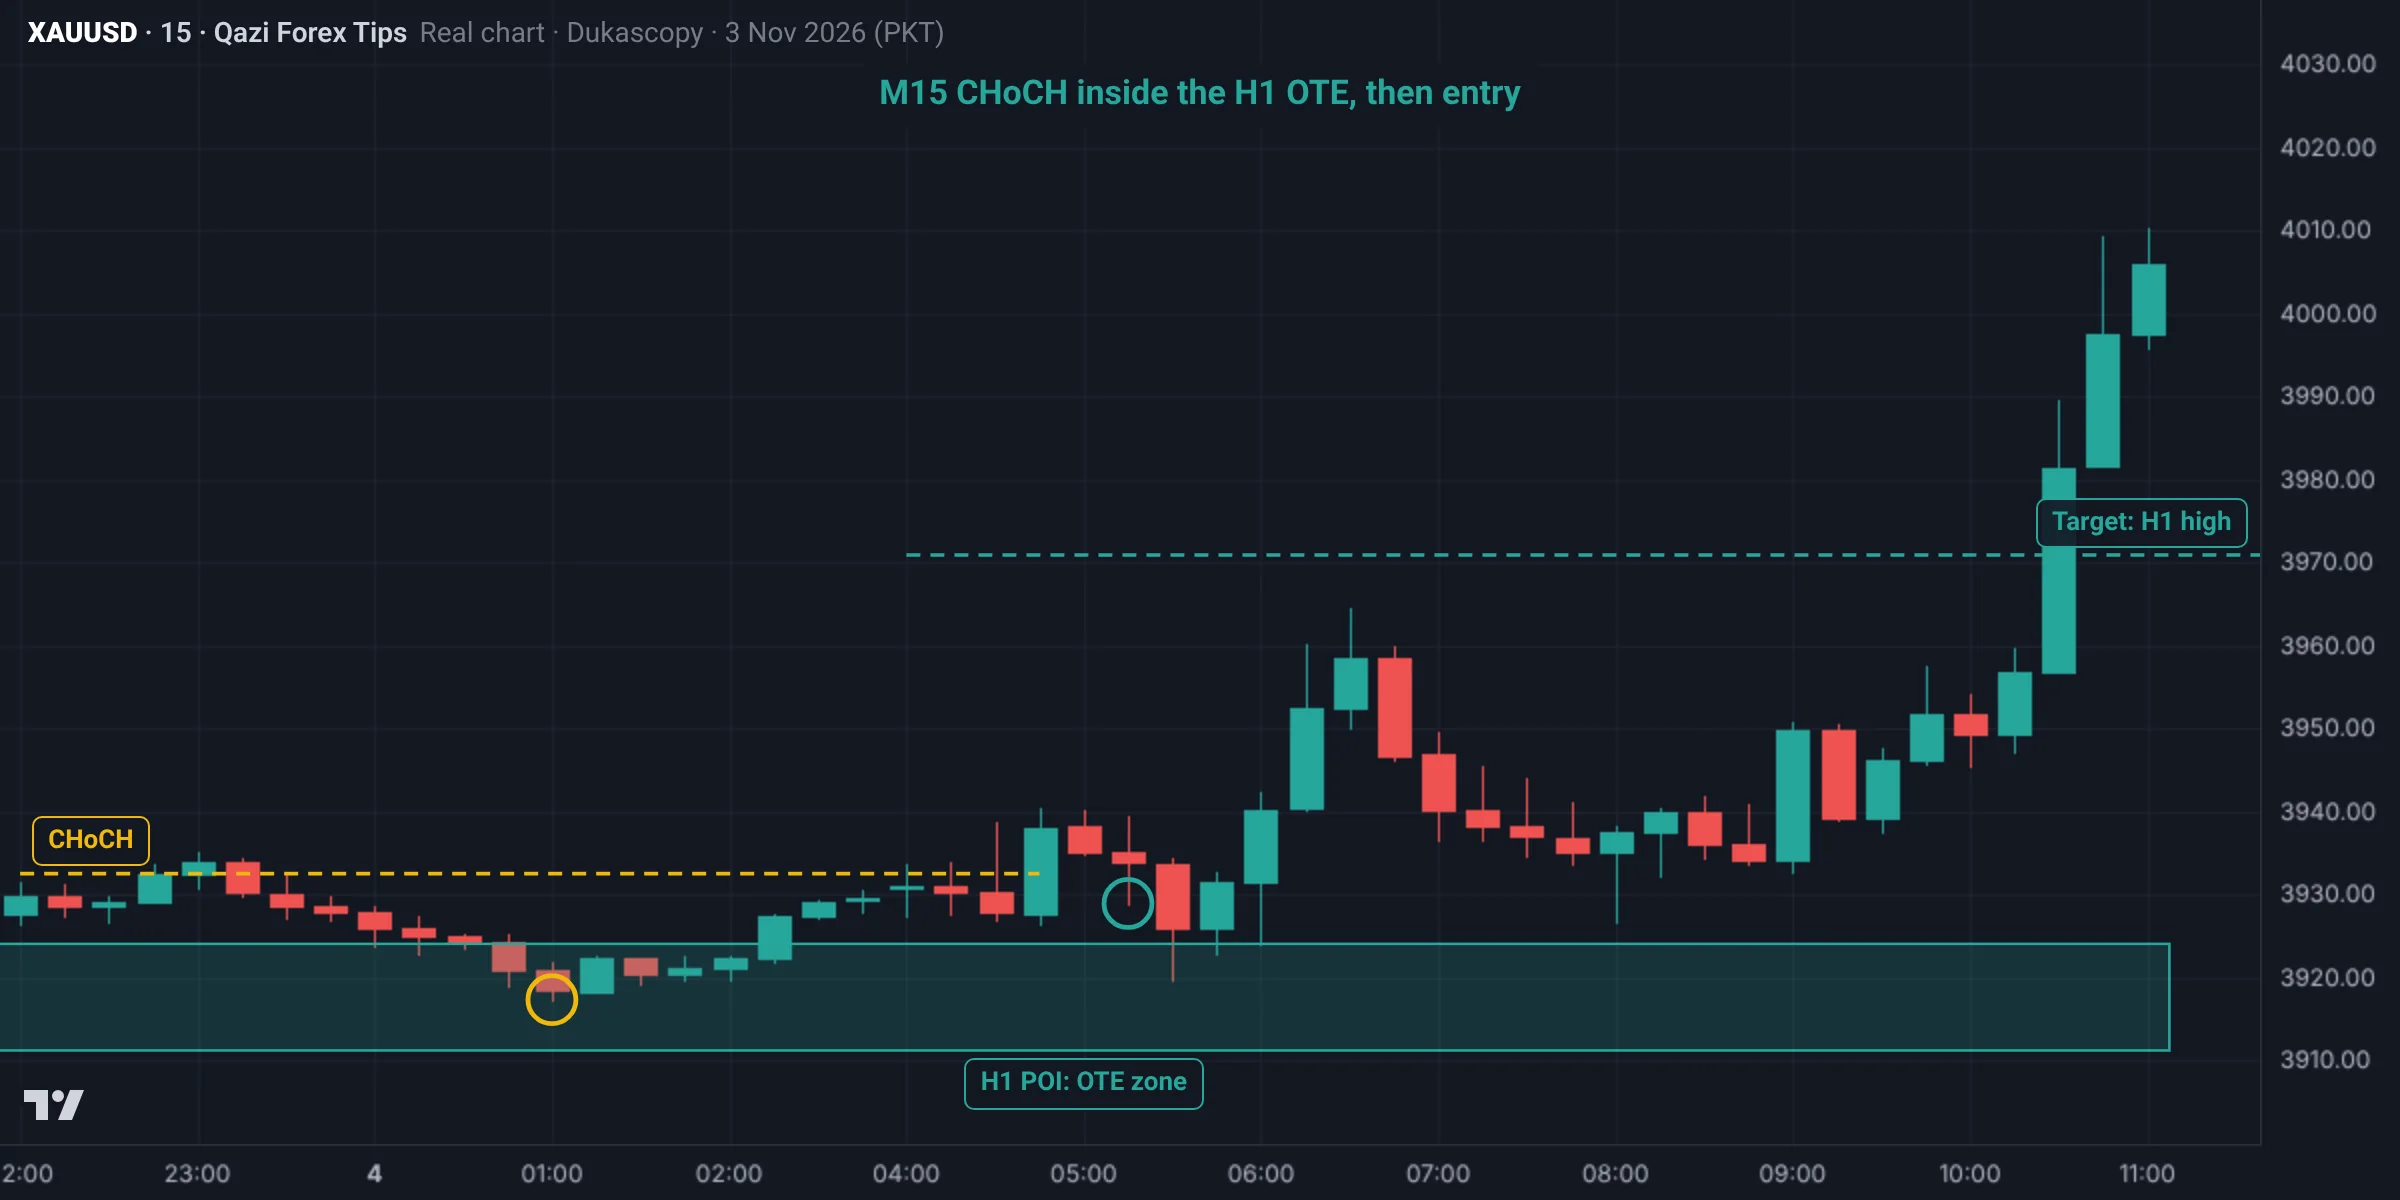
- H1 POI: the OTE zone of the 3,895.3 to 3,970.9 leg, 3,911.2 to 3,924.0 (lesson 3.6).
- At 01:00 on 4 Nov price reached 3,917.3, inside the zone. M15 still showed LHs and LLs; the last LH was 3,932.5.
- The 04:45 M15 candle closed at 3,938.1: a CHoCH.
- Entry: the 50% of the CHoCH leg (3,917.3 to 3,940.4) at 3,928.9, filled at 05:15. SL 3,915.5 (below the zone low), risk $13.4.
- At 05:30 price dipped to 3,919.6 without hitting the stop. At 10:30 it broke the H1 high at 3,970.9: $42, about 1:3.1.
Second example: a model B sell (11 Nov)
Gold M15 on 11 Nov 2026 (data: Dukascopy, bid price; Pakistan time). The first example was a buy; this is a model B sell, and the POI is the one that scored 10/10 in the second example of lesson 3.7:
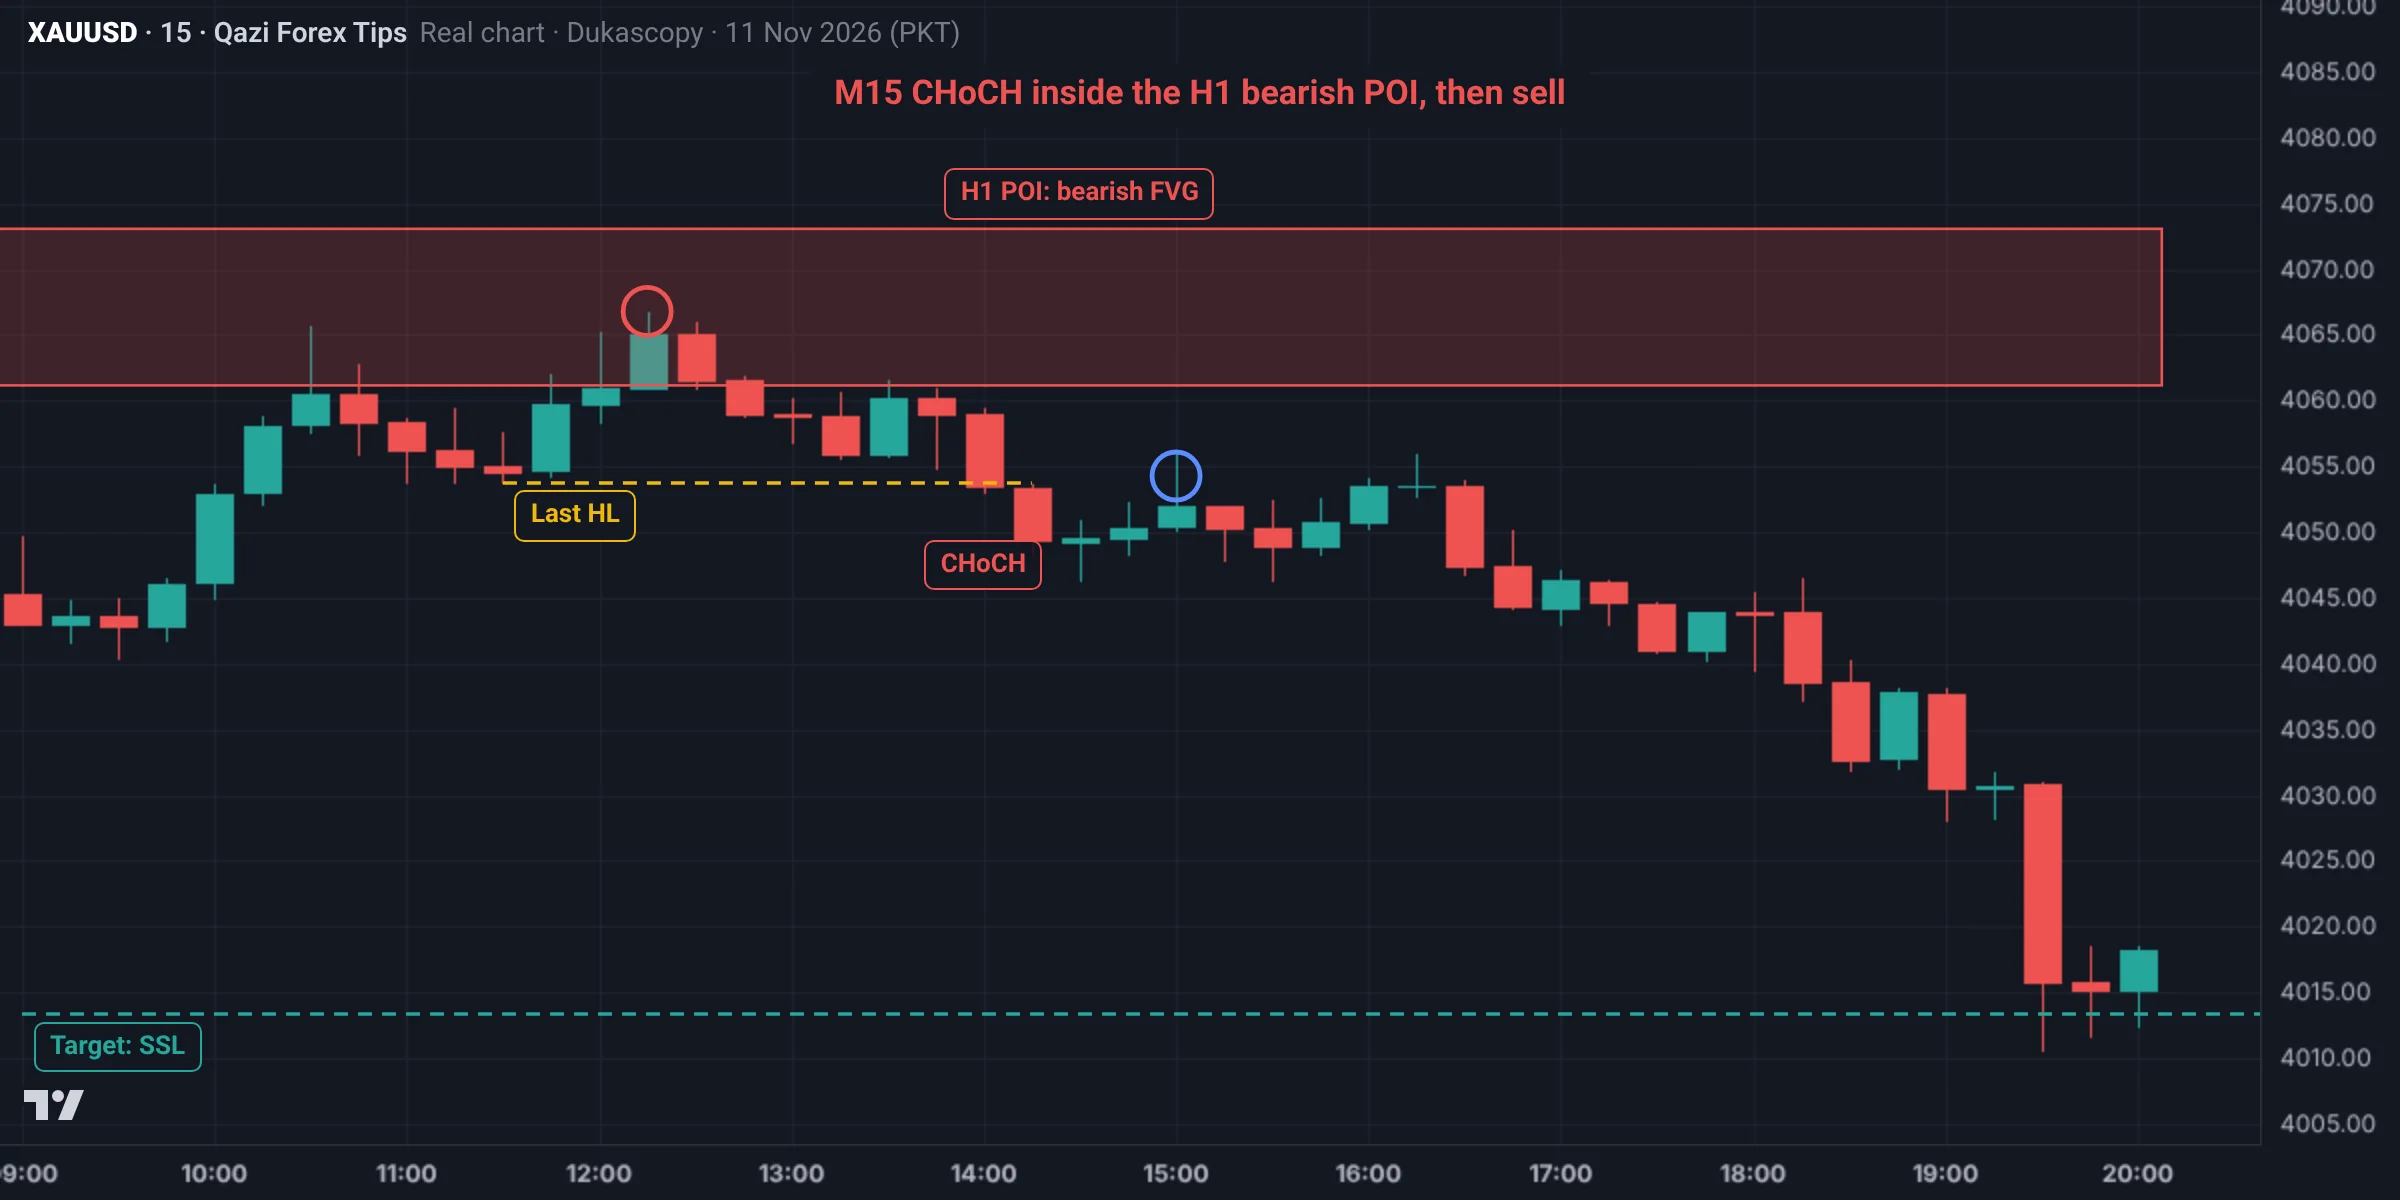
- HTF POI: the H1 bearish FVG from 4,061.2 to 4,073.1.
- At 12:15 price was inside the zone at 4,066.8. M15 was still printing HHs and HLs; the last HL was 4,053.7 (11:30).
- The 14:00 M15 candle closed below that last HL at 4,053.5: a CHoCH down.
- Entry: the CE of the CHoCH move's FVG (4,053.7 to 4,054.9), 4,054.3, filled at 15:00. SL above the zone high at 4,068.0, risk $13.7.
- Target: the 10 Nov low at 4,013.4 (SSL), reached at 19:30: about 1:3.0.
Common mistakes
Summary
- Model B: price reaches the HTF POI, a CHoCH forms on the LTF, enter from the LTF POI.
- For Gold, an H1 POI with M5 or M1 confirmation is the best pair.
- Small SL, big RR; some trades are missed, but failing zones cost nothing.
- Best setup: HTF POI + sweep + LTF MSS + FVG.
Spot it on the chart: practice
This is a real Gold chart (Dukascopy data, Pakistan time). Study it and pick an answer. After you answer, the fully marked chart and the explanation appear.
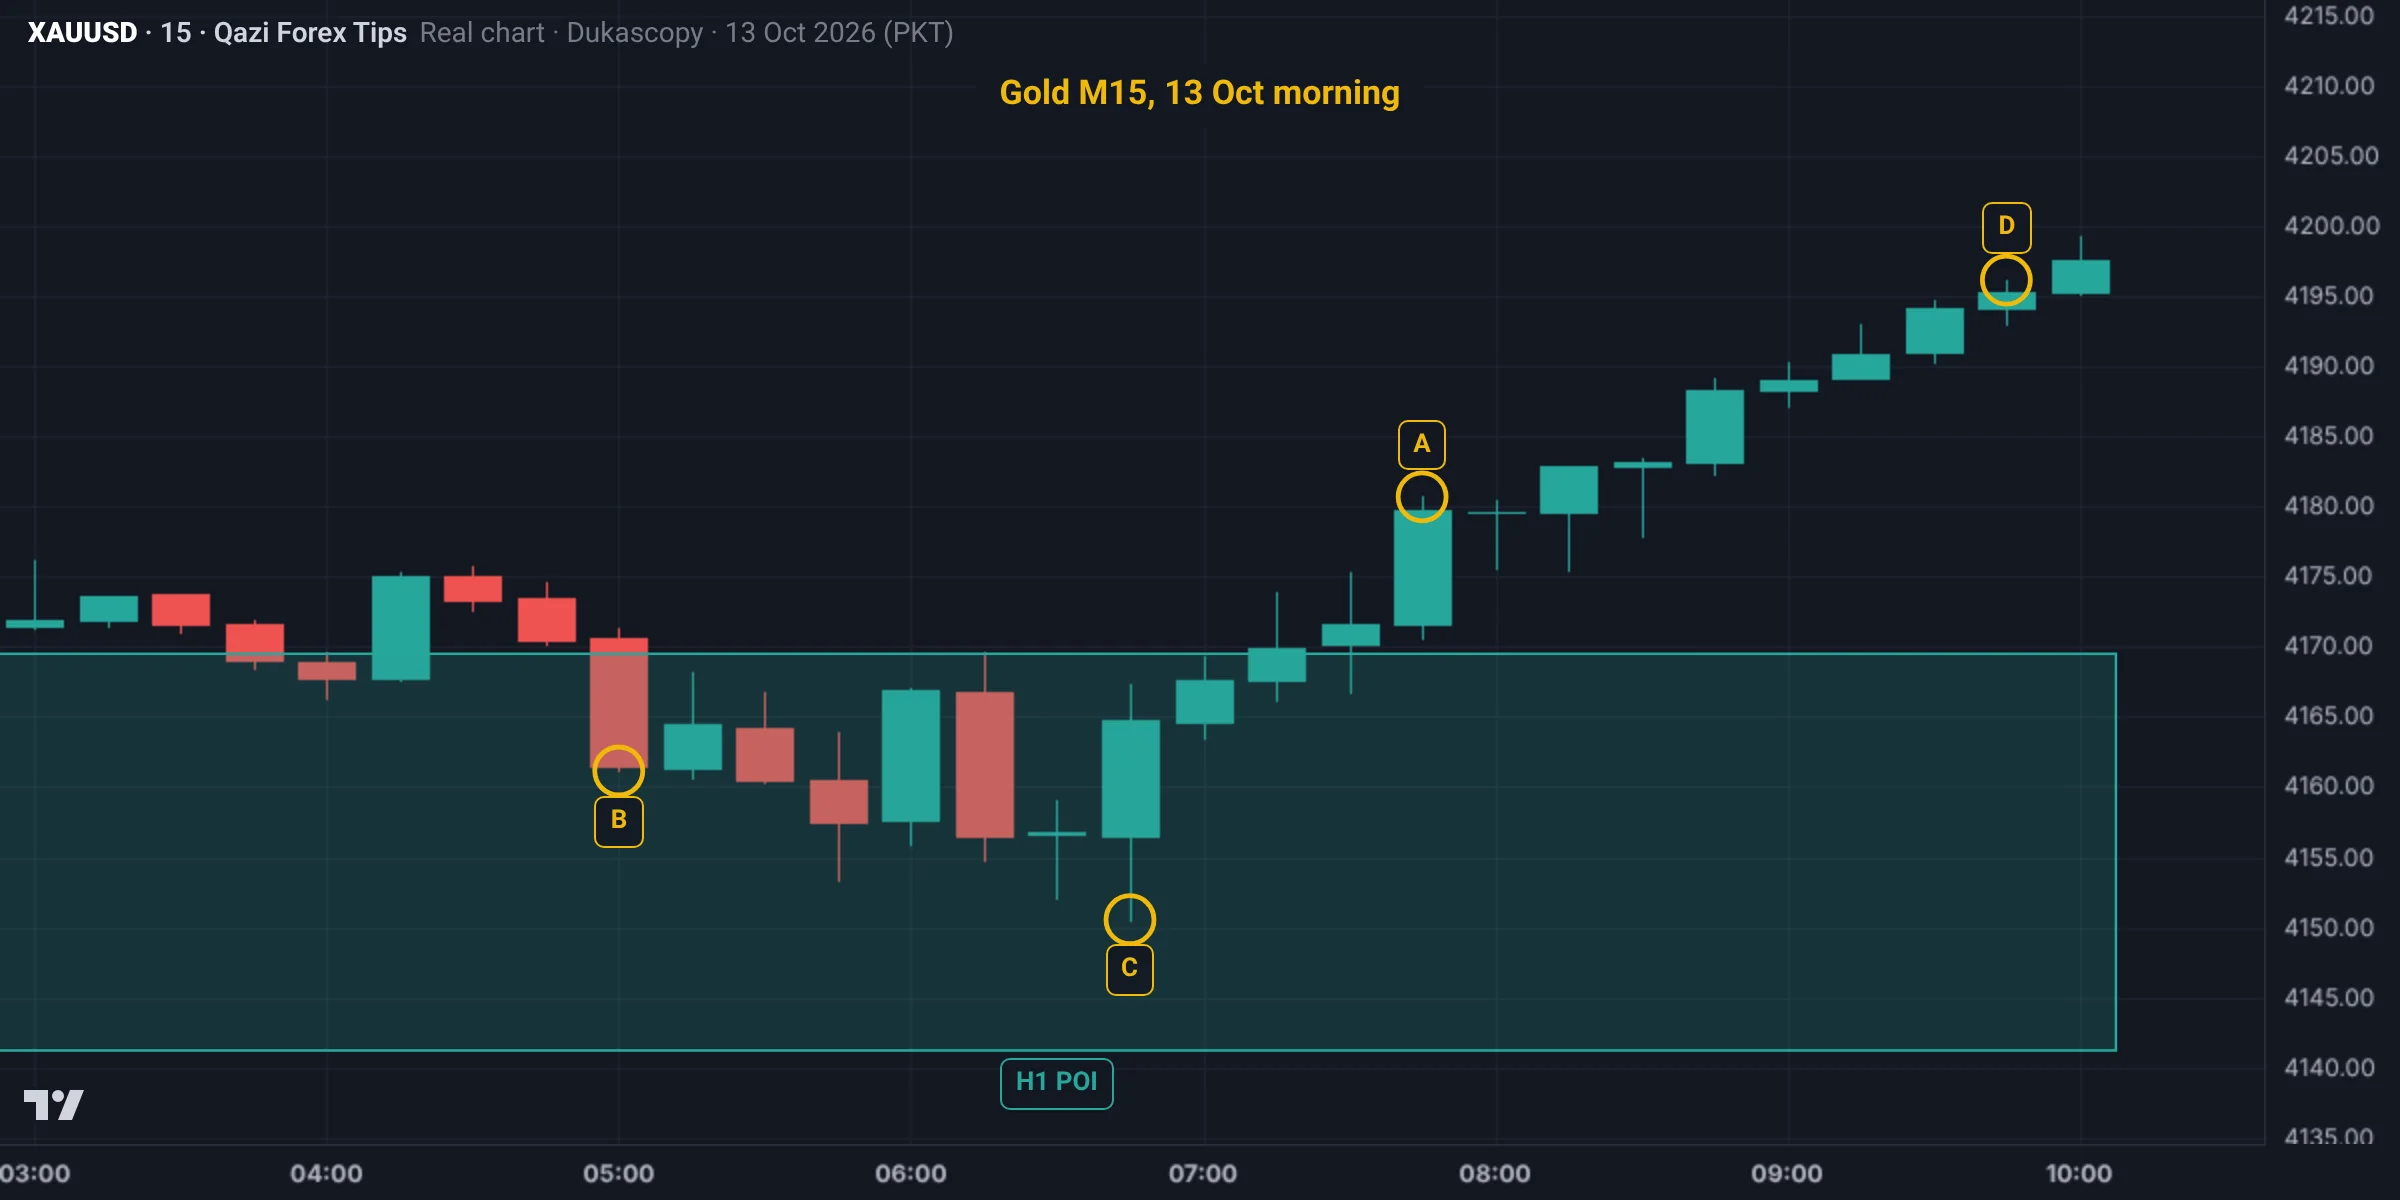
Price came into the bullish H1 zone (4,141.2 to 4,169.5). In model B, which is the entry trigger?
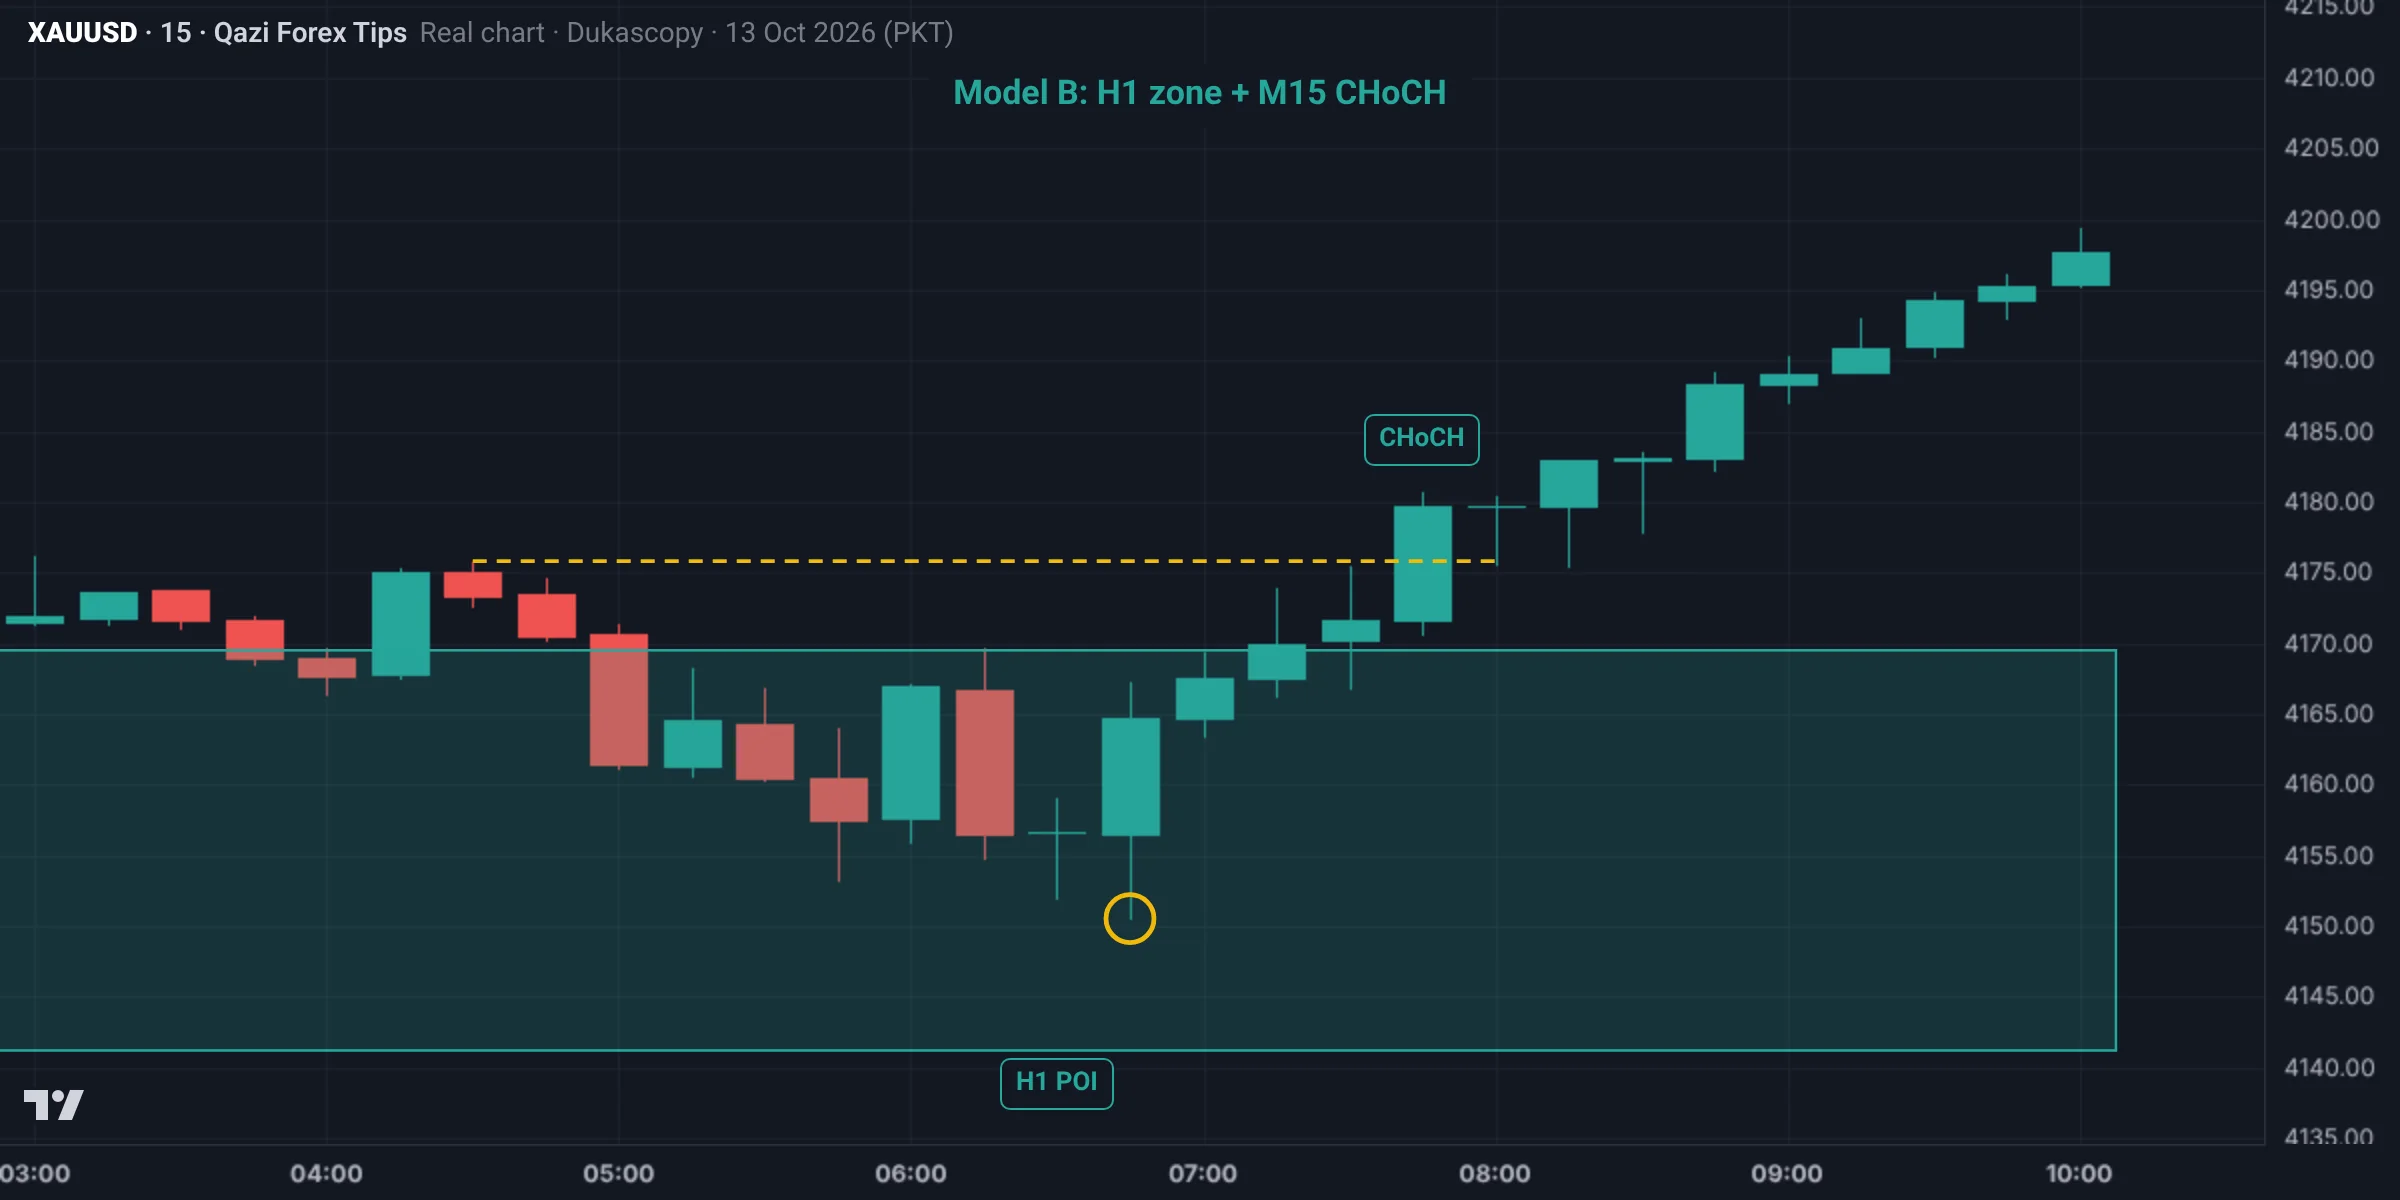
A (07:45): the M15 candle closed at 4,179.7, above the 4,175.8 LH from before price entered the zone: that is the LTF CHoCH. The SL goes below the low inside the zone at 4,150.5. B is the first touch of the zone (no confirmation), C tries to catch the low, and D chases after the move.
The marked chart
Test yourself: Lesson 5.3 quiz
8 questions. Pick one answer for each and you will see at once whether it is right and why. Your score and grade appear at the end. You need 70% to pass.
0 correct · 0 / 8
Question 1What is the idea of model B?
The stop shrinks and the RR multiplies.
Question 2Which model B pair is best for intraday Gold?
Rule: the LTF is usually 10 to 15 times smaller than the HTF.
Question 3What if price slices straight through the HTF POI with no LTF CHoCH?
That is model B's biggest benefit.
Question 4Where is the SL in model B?
The target is the higher timeframe DOL.
Question 5A direct limit on the H1 OB (4,124, SL 4,112) vs model B (4,120, SL 4,116), target 4,150. The RR difference?
Model B misses some trades, but the ones it takes have far better RR.
Question 6Where are model A and model B most common?
The best trades often combine both: a sweep inside the HTF POI, then an LTF MSS and FVG.
Question 7What is the problem with an H4 zone and an M1 entry?
One green candle is not a CHoCH; a CHoCH is a body break of the last LH.
Question 8H1 closes below the HTF POI. What do you do?
Refusing to accept a broken zone is a common mistake.
Lesson checklist
Tick each point once you understand it. Your ticks are saved in this browser.
Assignment
- Mark 10 strong POIs on Gold H1 over the last two weeks.
- Open M1 or M5 on each: did a CHoCH form? Where would the entry be?
- Record the RR and result for both a direct HTF limit and model B.
- How many zones broke, and how much loss did model B avoid?
- Post your comparison in the group.
Post your assignment screenshots with your reasons in our free Facebook group, where your charts will be checked.
Join the free group
Who wrote this lesson
Dr. Qazi Abdul Basit, Ph.D
Ph.D in Business Administration and a forex and Gold trader since 2013. Founder of Qazi Forex Tips, which teaches traders in Pakistan and India price action, risk management and trading psychology in their own language: 65 student batches so far, free courses on YouTube, and MT5 tools for traders (QFT Replay Simulator, QFT Trade Assistant).
- 2013 trading since
- 75K+ Facebook group members
- 65 student batches
- 15K+ YouTube subscribers
How this lesson was made: the content follows Dr. Qazi's teaching method and years of trading. Real charts are built from Dukascopy Gold (XAUUSD) data, and backtest results are shown as they came out, even when negative. We do not sell signals, manage accounts or take money from any broker. Last updated: 19 November 2026.
Questions
What is a HTF POI with LTF CHoCH entry?
Mark a strong higher timeframe point of interest, wait for price to reach it, then enter after a lower timeframe change of character from the new small POI.
Which pair is best for Gold?
An H1 POI with M5 or M1 confirmation.
Why use a lower timeframe for entry?
It shrinks the stop loss, raising the reward-to-risk ratio, and filters out zones that are breaking.
What is the best SMC entry strategy?
There is no single best; the best is the one you have backtested. For a new trader model B is easiest, a higher timeframe POI with a lower timeframe CHoCH, because direction and location are settled first.
Where does the stop go in model B?
Beyond the lower timeframe swept high or low, or beyond the whole HTF zone. Whichever is logical, calculate the lot from that distance.
Read more
Education only, not financial advice. Trading forex, Gold and CFDs carries a high risk of loss. SMC concepts describe tendencies, not guarantees. Lesson 30 of 38.