 Qazi Forex Tips

What is a rejection block?
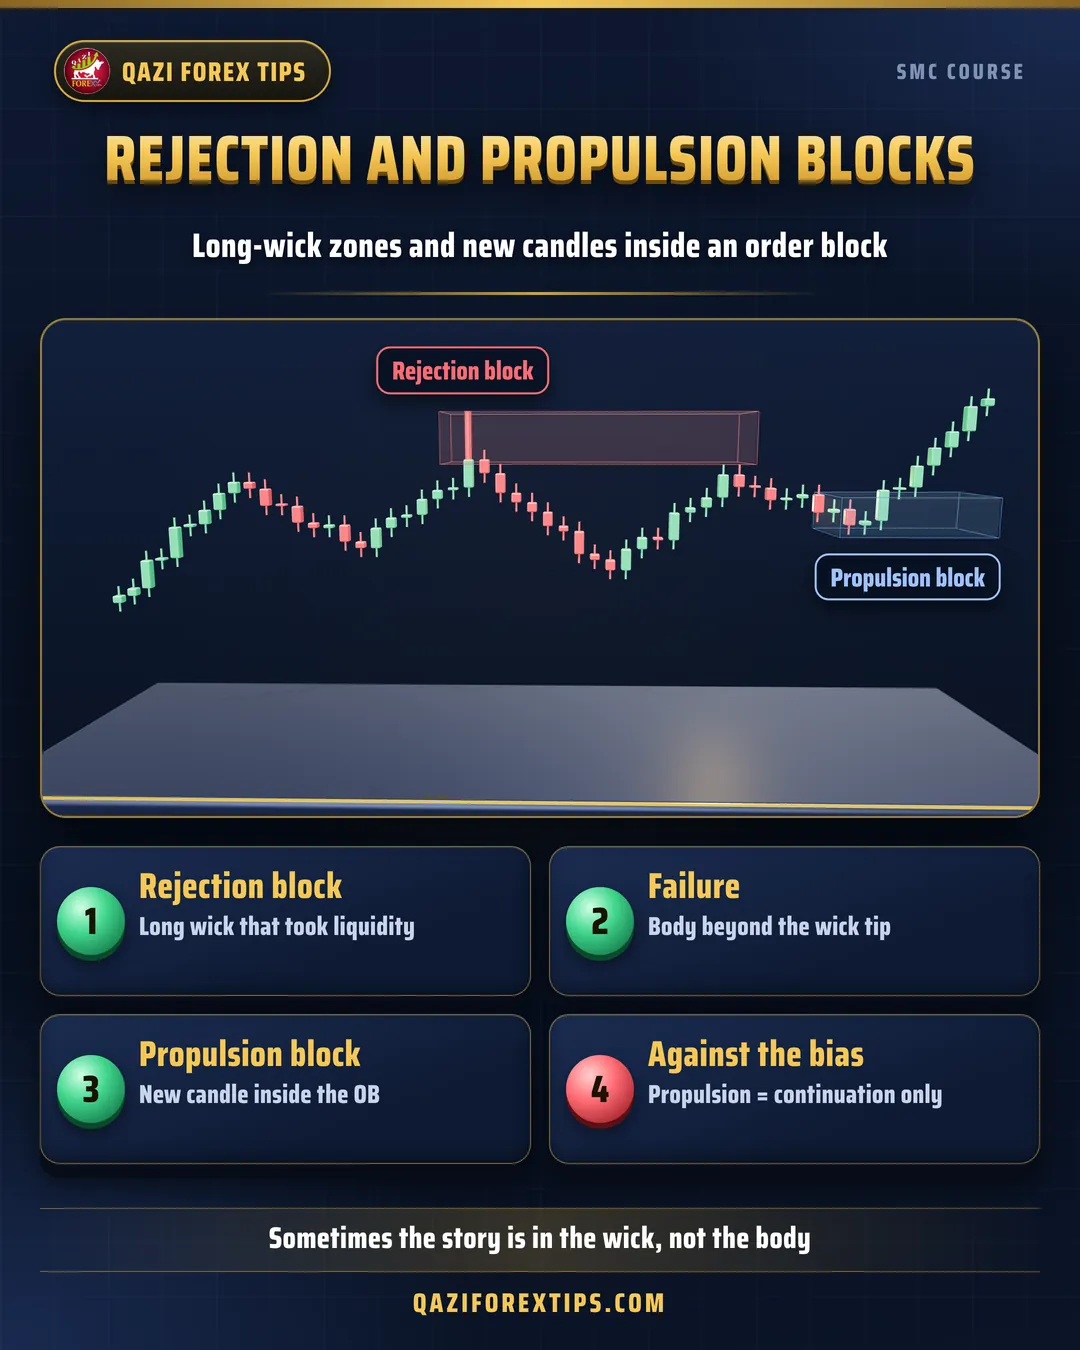
A rejection block is a zone formed by long wicks when price takes the liquidity beyond a clear high or low and immediately comes back.
- Bearish rejection block: a long upper wick formed above a previous high (BSL). The zone runs from the top of the body (whichever of open or close is higher) to the wick tip.
- Bullish rejection block: a long lower wick formed below a previous low (SSL). The zone runs from the bottom of the body to the wick tip.
Why rejection blocks form
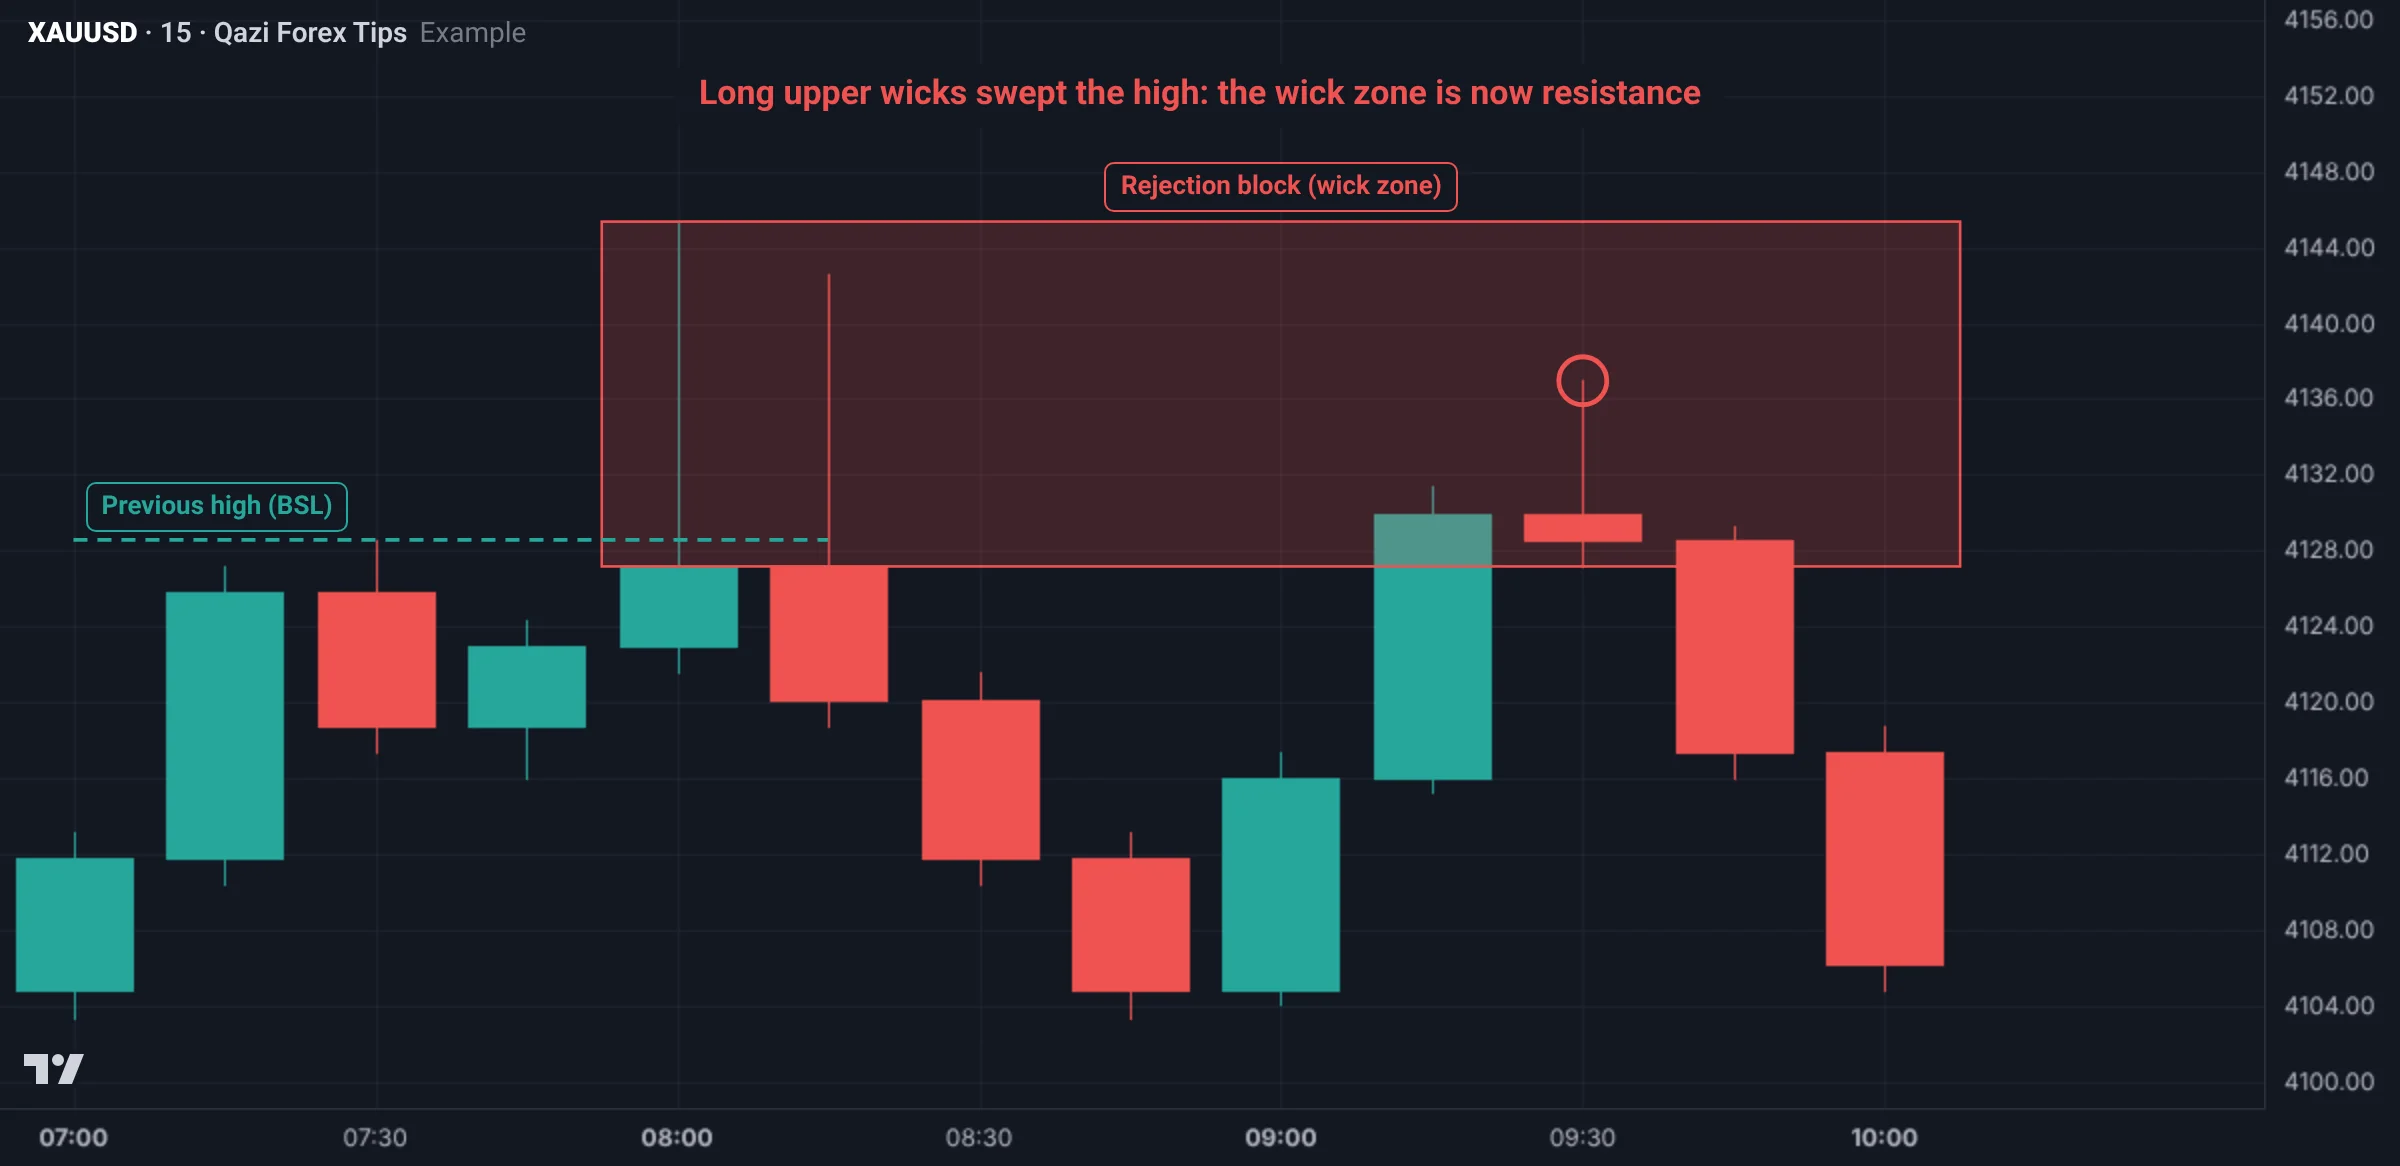
A long wick means price went up, took the liquidity there (sellers' stops and breakout buyers), but was not allowed to stay. Large sellers filled their sells right there and pushed price back down. When price returns to the wick area, the rest of those sellers' orders are waiting.
Marking a rejection block
- Find a clear high or low that a wick went beyond while the body closed back inside (a sweep, not a break).
- The wick should be long, at least as long as the body.
- Zone: from the body edge to the wick tip. With several wicks, use the highest one.
- Failure rule: if a later candle closes its body beyond the wick tip, the rejection block has failed.
- Entry near the 50% of the zone or on lower timeframe confirmation inside it. Stop loss beyond the wick tip.
What is a propulsion block?
To propel means to push forward. A propulsion block is a candle that trades into an earlier order block and then propels the next move. A bullish example:
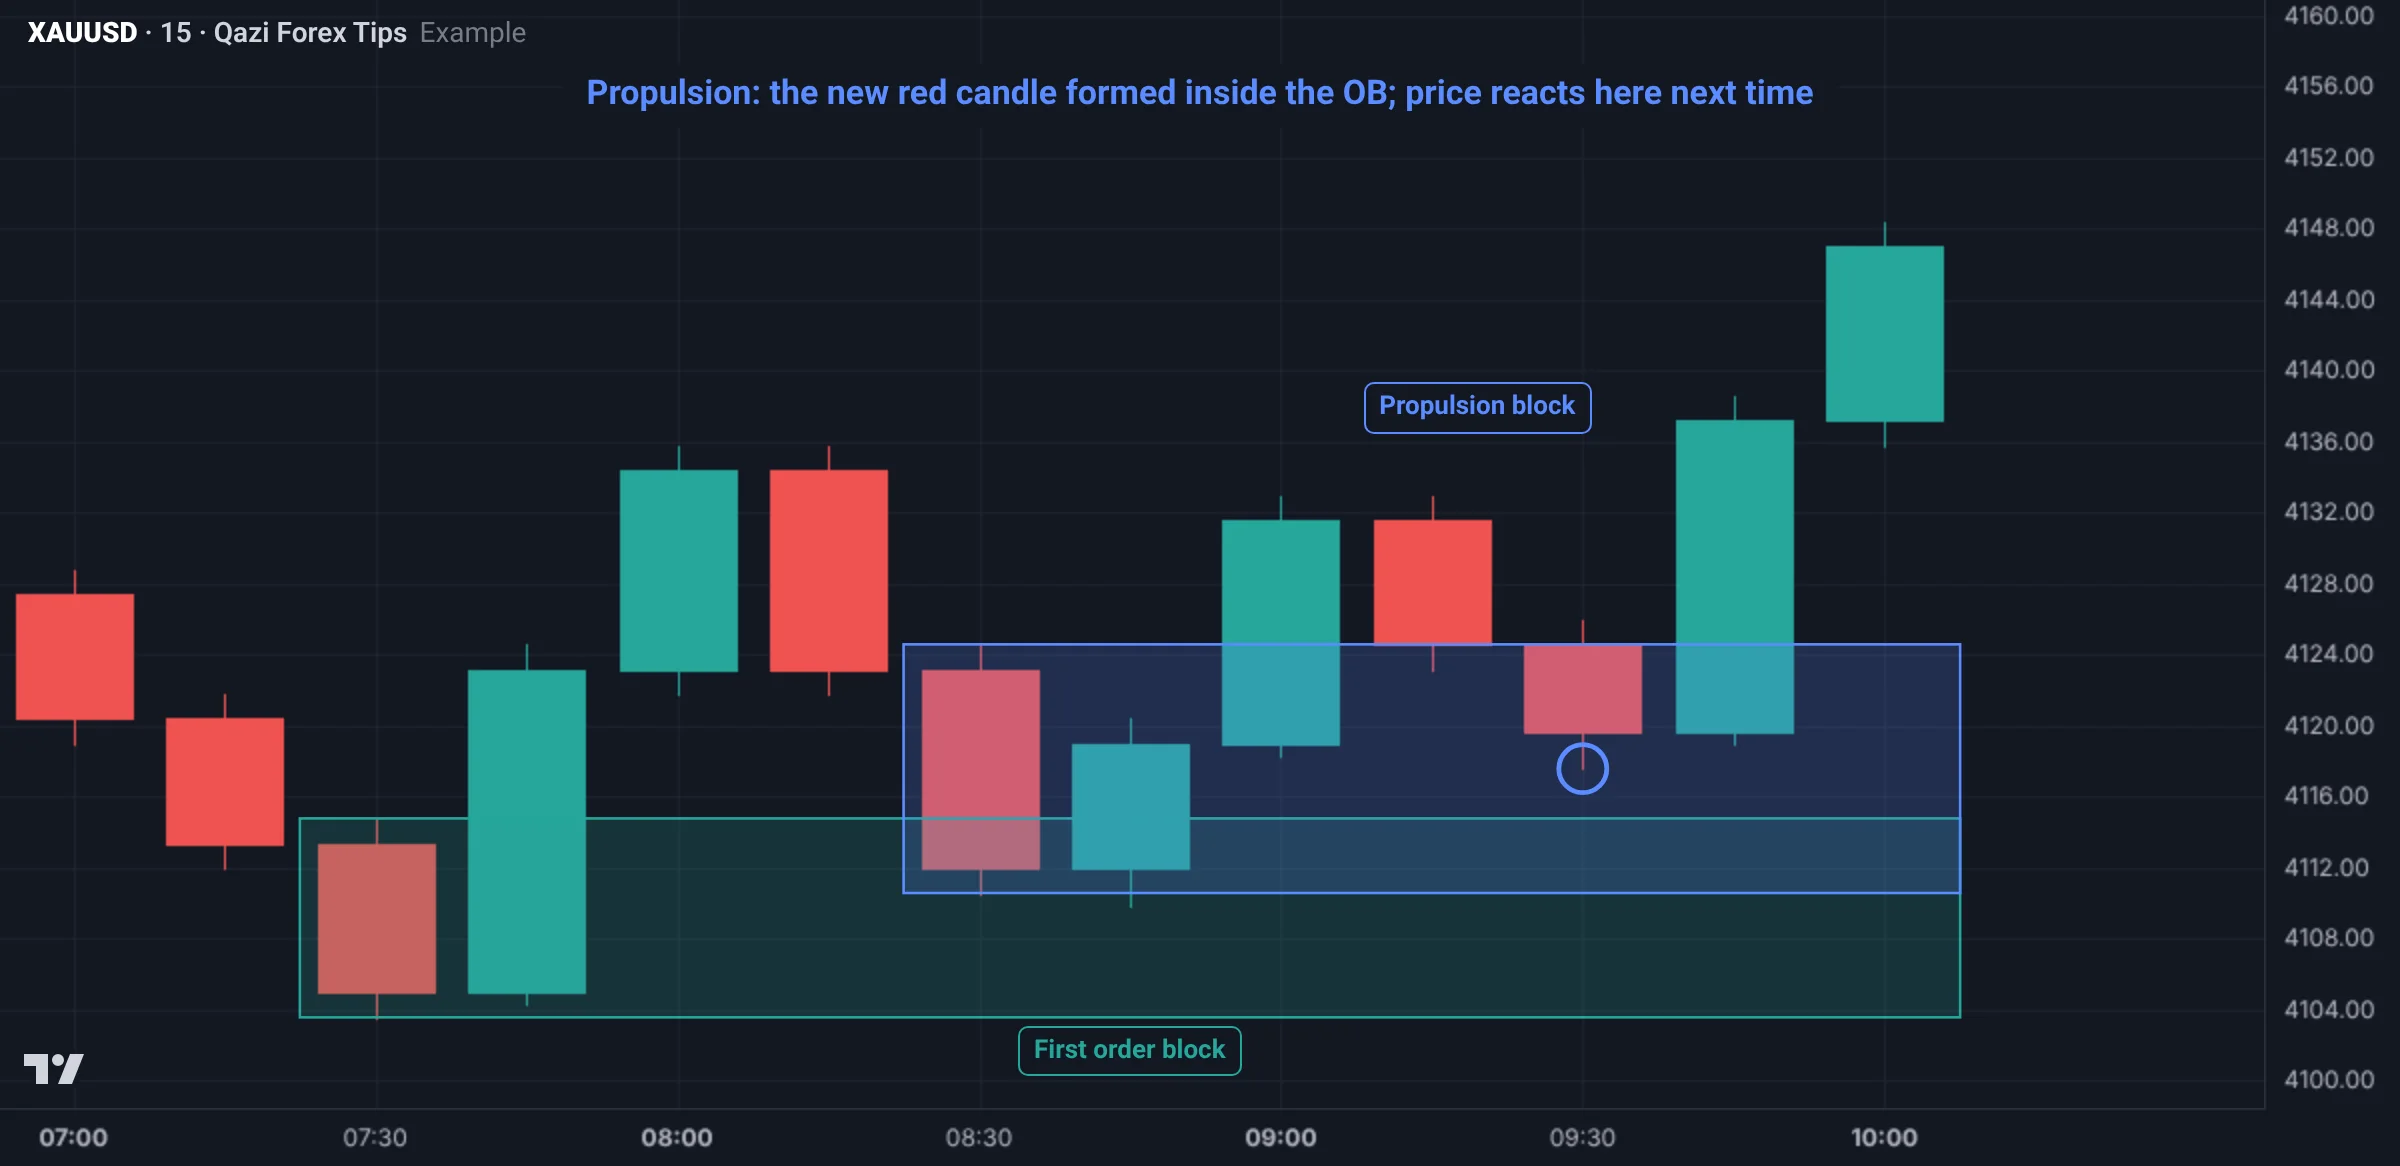
- A bullish order block formed and price went up.
- Price came back and traded into the upper part of the order block, forming a red candle whose low sat inside the order block.
- After that red candle, price rallied strongly again. That red candle is now the propulsion block.
- Next time price returns, it often does not reach the original order block but turns from the propulsion block.
Why the propulsion block matters
- It is a sign of trend continuation: the large player is aggressive enough not to let price go deep.
- It is smaller and higher than the original order block, so the stop is smaller and the RR better.
- If price closes a body below its 50%, it will likely reach the original order block. Look for the entry there instead.
Comparison
| Point | Rejection block | Propulsion block |
|---|---|---|
| Made from | Long wicks that sweep liquidity | A new candle formed inside an order block |
| Where it appears | At key highs or lows, often at reversals | Mid-trend, in continuation |
| Zone | Body edge to wick tip | That candle's high to low (or body) |
| Failure | Body closes beyond the wick tip | Body closes below 50%, then watch the original OB |
Gold example: rejection block
On Gold M15 the previous day's high was 4,137. In the London session a candle reached 4,149 but closed at 4,138; the next candle also wicked to 4,147 and closed lower.
- Bearish rejection block: 4,138 to 4,149, 50% about 4,143.5.
- Price then fell to 4,120, came back up to 4,142 in New York, and an M1 CHoCH formed down.
- Entry 4,141, stop 4,151 (above the wick tip), risk $10; target the low at 4,118, $23, about 1:2.3.
- If any M15 candle had closed its body above 4,149, the block would have failed.
Gold example: propulsion block
On Gold H1 a bullish order block sat at 4,103 to 4,111. Price rallied, came back to 4,108, and formed a red candle there (4,108 to 4,118). Large green candles then made a new high.
- Propulsion block: 4,108 to 4,118.
- On the next return price only reached 4,117 and rallied from there, never reaching the original order block.
- A trader waiting only with a limit at 4,111 missed the entry. The trader who knew the propulsion block was already in.
Real Gold chart examples
Gold H1 on 9 and 10 Nov 2026 (data: Dukascopy, bid price; Pakistan time):
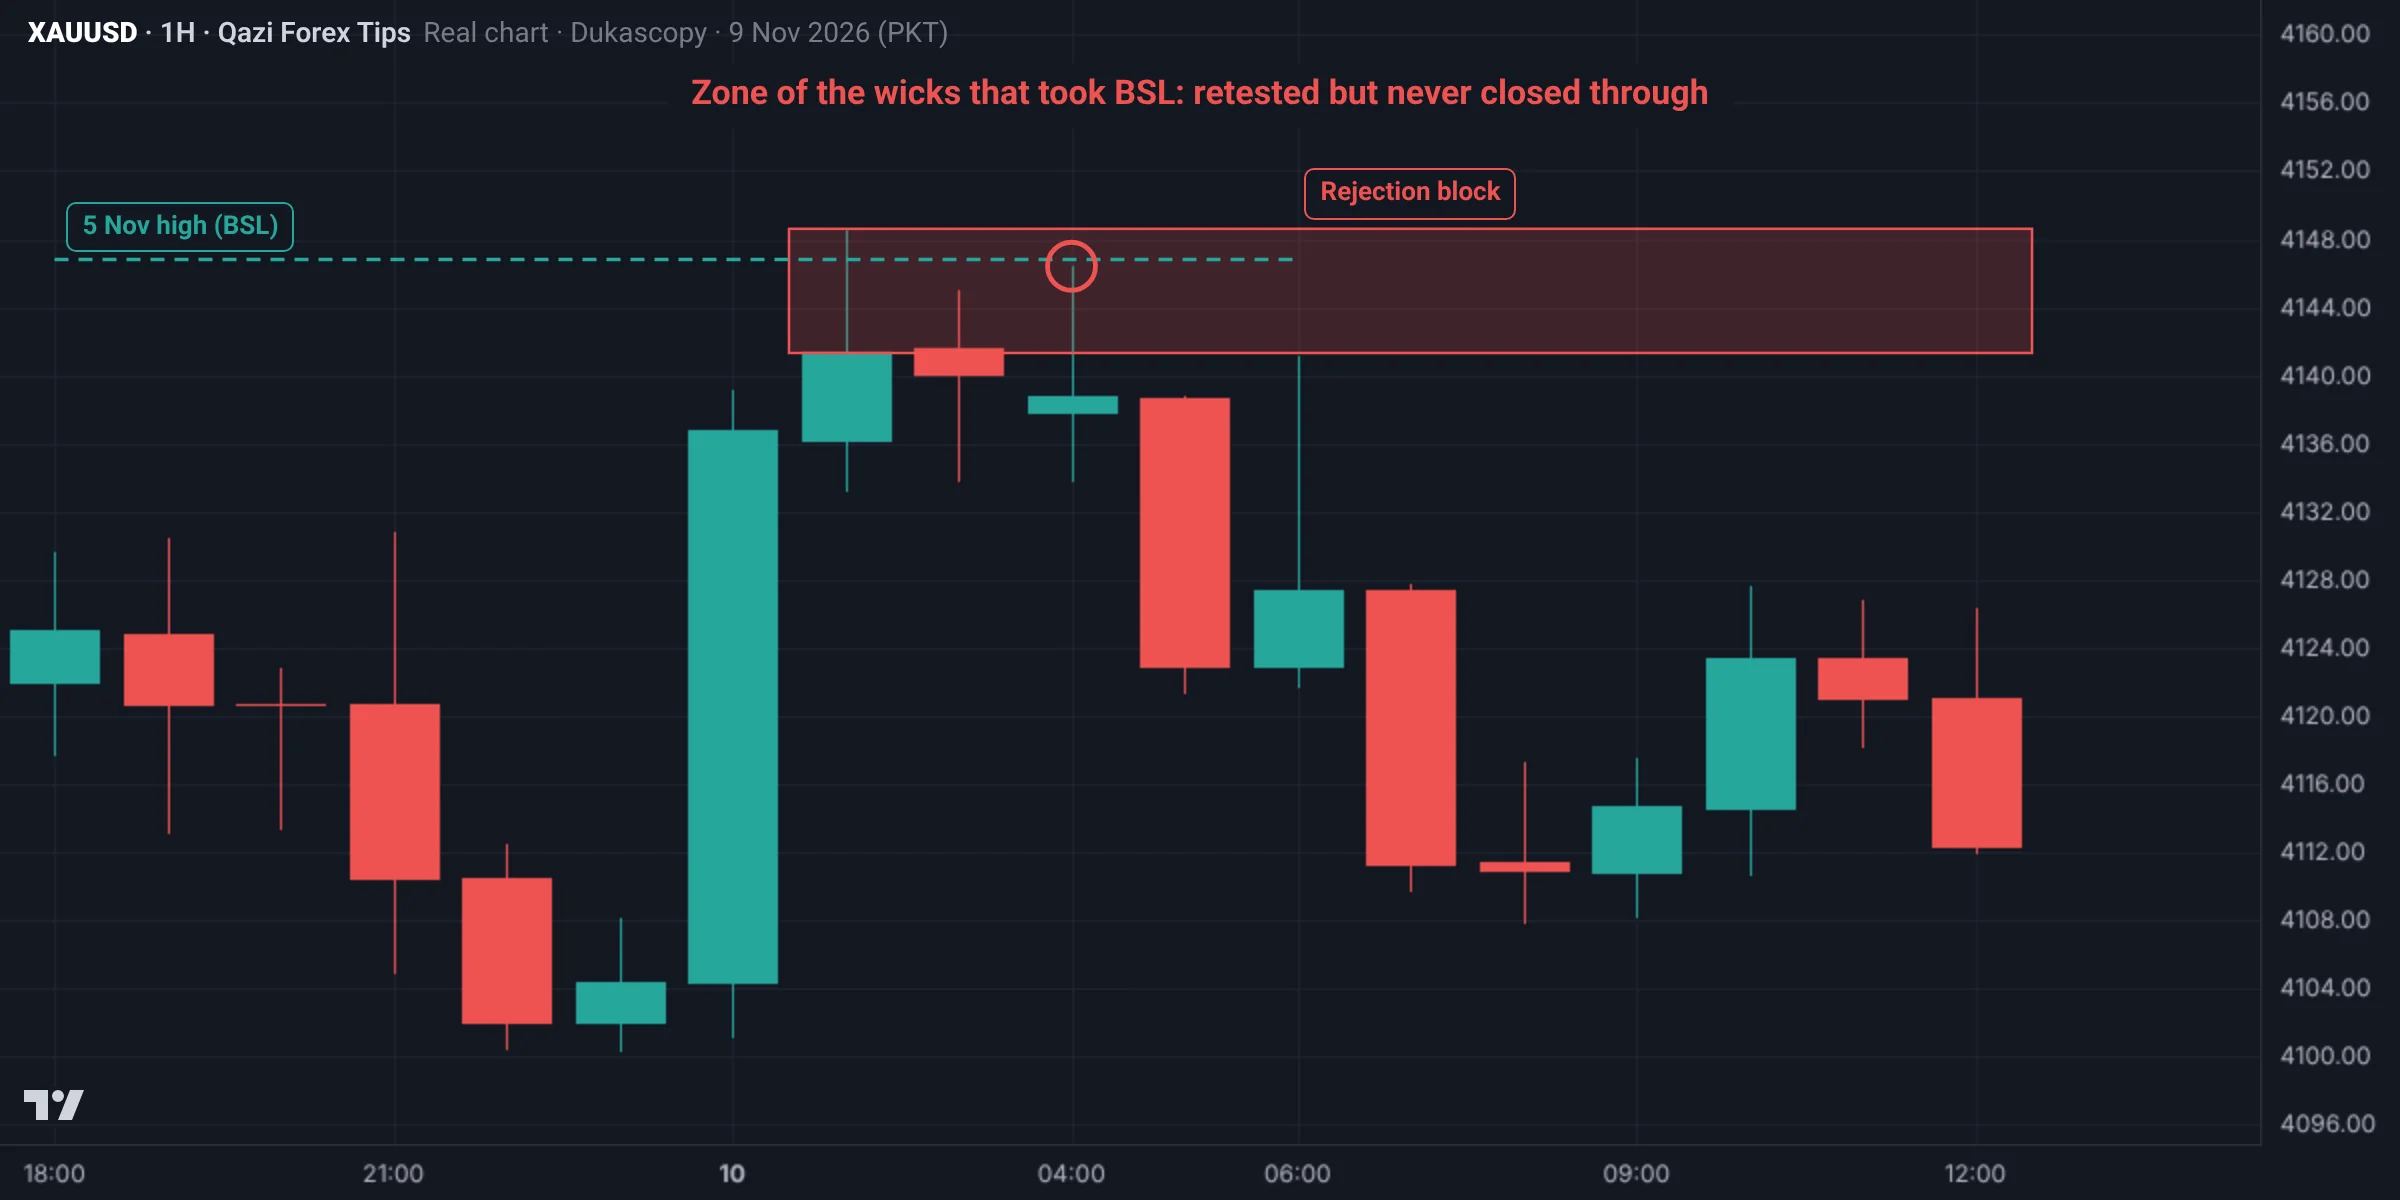
- The 01:00 candle on 10 Nov wicked to 4,148.6, taking the BSL above the 5 Nov high at 4,146.8, and closed at 4,141.3.
- The rejection block: from the top of the body at 4,141.3 to the wick tip at 4,148.6.
- At 02:00 a wick reached 4,145.0 and at 04:00 4,146.4: both times price entered the zone but did not close beyond the wick tip.
- Gold then fell to 4,107.9 by midday and to 3,852 within two days.
Second example: a bullish rejection block (12 Nov)
Gold H1 on 12 and 13 Nov 2026 (data: Dukascopy, bid price; Pakistan time). The first example was a bearish rejection block; this one is bullish:
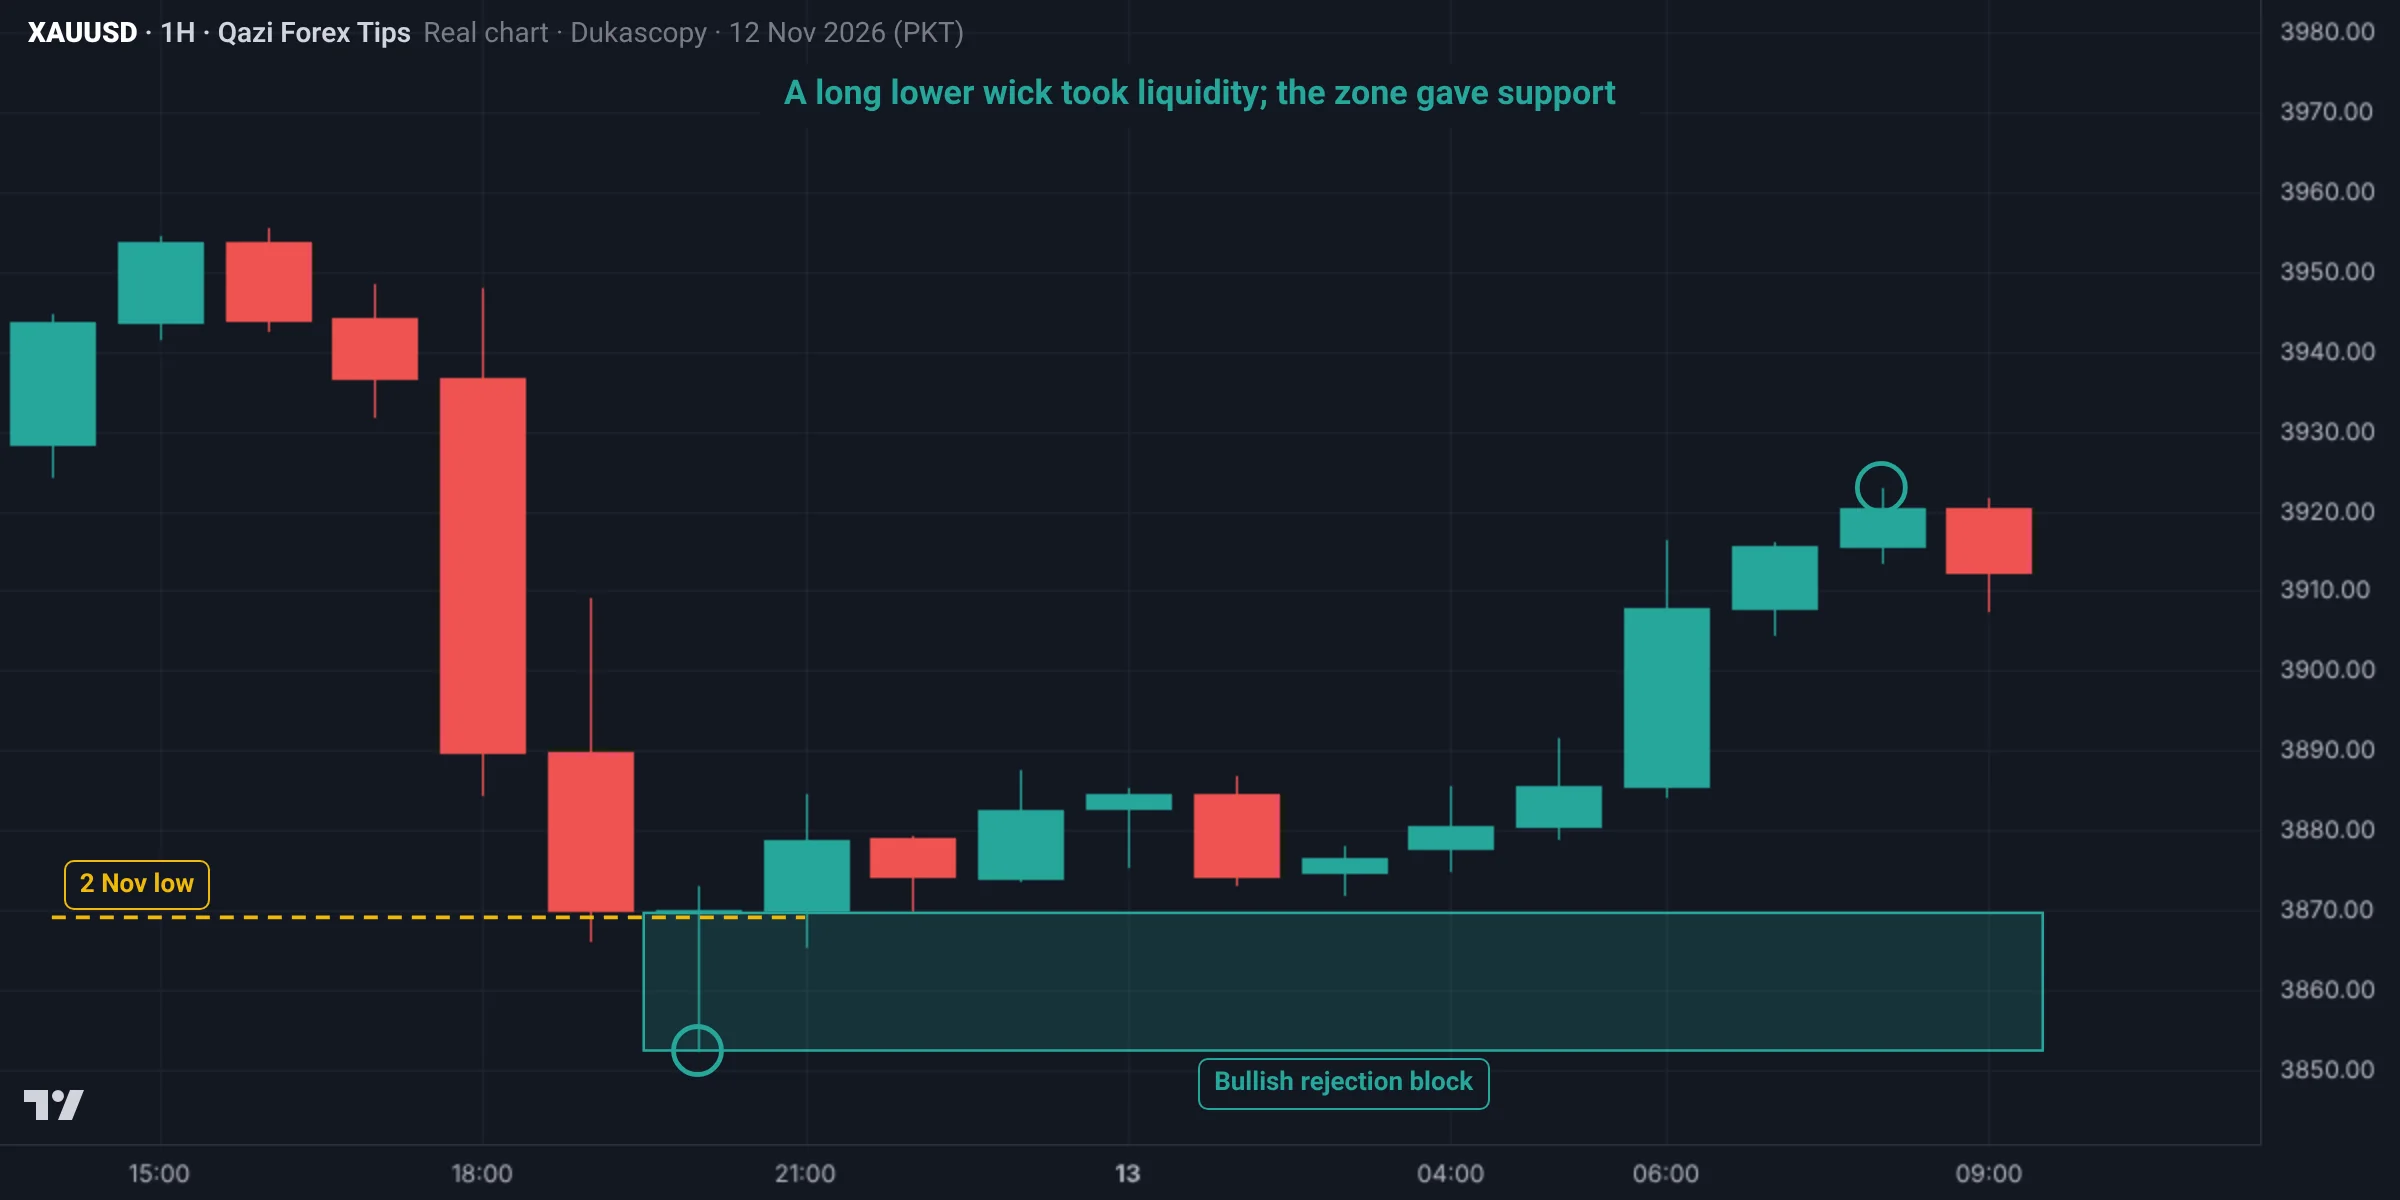
- The wick of the 20:00 candle on 12 Nov reached 3,852.3, below the 2 Nov low at 3,869.1 (the SSL from the second example in lesson 2.5), and the candle closed almost where it opened (3,869.6 to 3,869.9). A lower wick of about $17: liquidity taken and rejected.
- Rejection block: from the wick tip at 3,852.3 to the bottom of the body at 3,869.6.
- Price later came back to this zone but did not break 3,852.3 (the 13 Nov low was 3,865.5), and by the morning of 13 Nov it reached 3,923.0.
In a bearish rejection the upper wicks become resistance; in a bullish one the lower wicks become support.
Common mistakes
Summary
- Rejection block: the zone of long wicks that swept liquidity, from body edge to wick tip.
- A body close beyond the wick tip means the rejection block failed.
- Propulsion block: a new candle formed inside an order block that pushes the next move.
- From a propulsion block, price often turns before reaching the original order block.
Spot it on the chart: practice
This is a real Gold chart (Dukascopy data, Pakistan time). Study it and pick an answer. After you answer, the fully marked chart and the explanation appear.
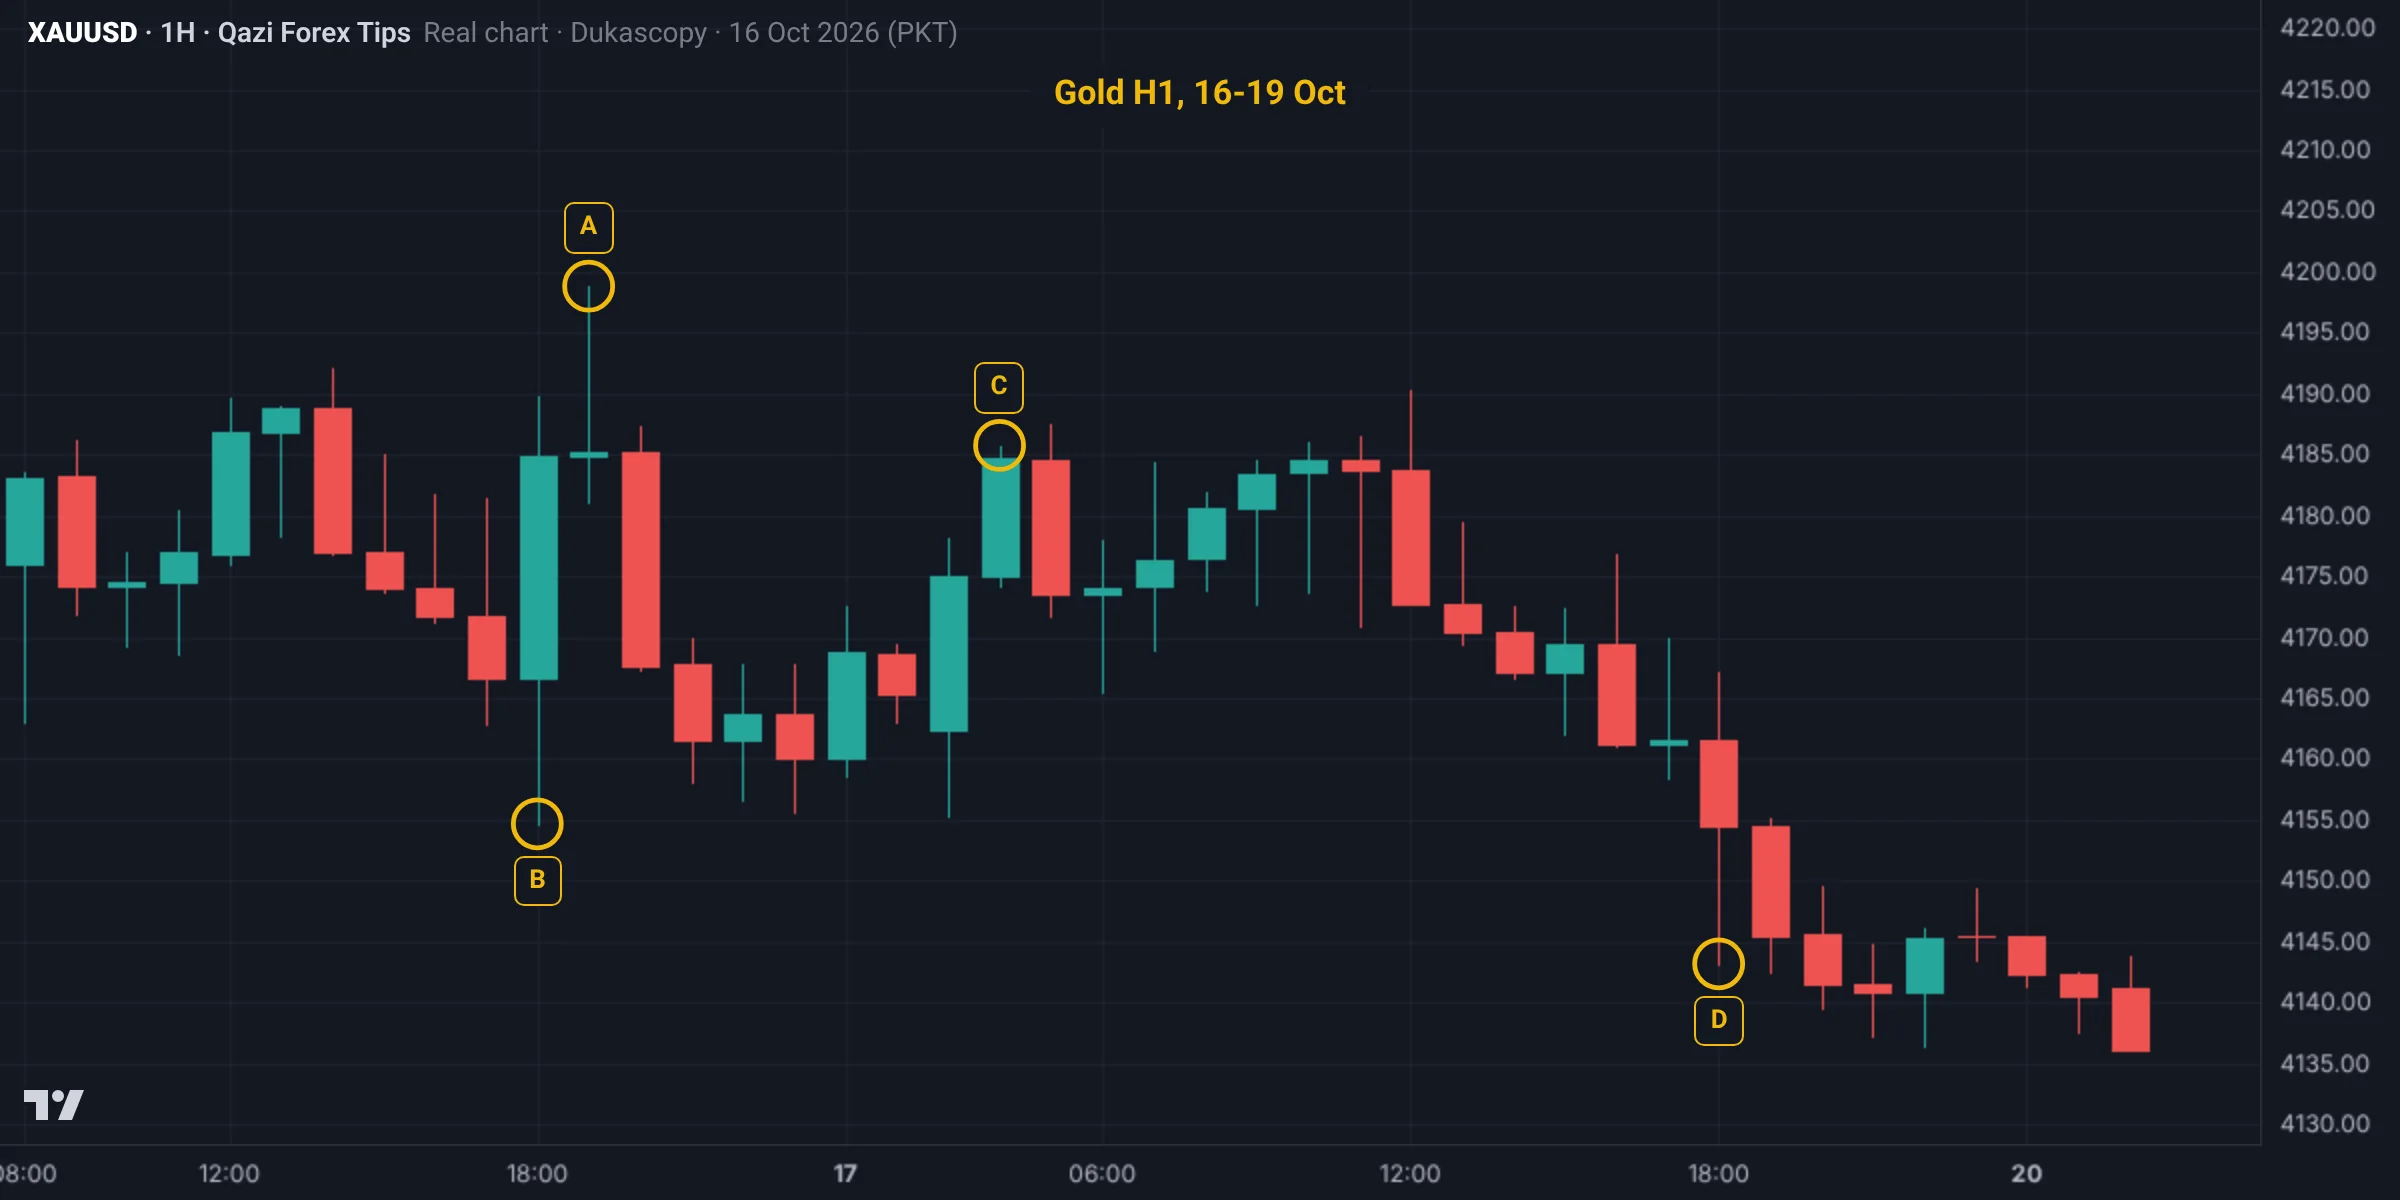
Which of these candles forms a bearish rejection block?
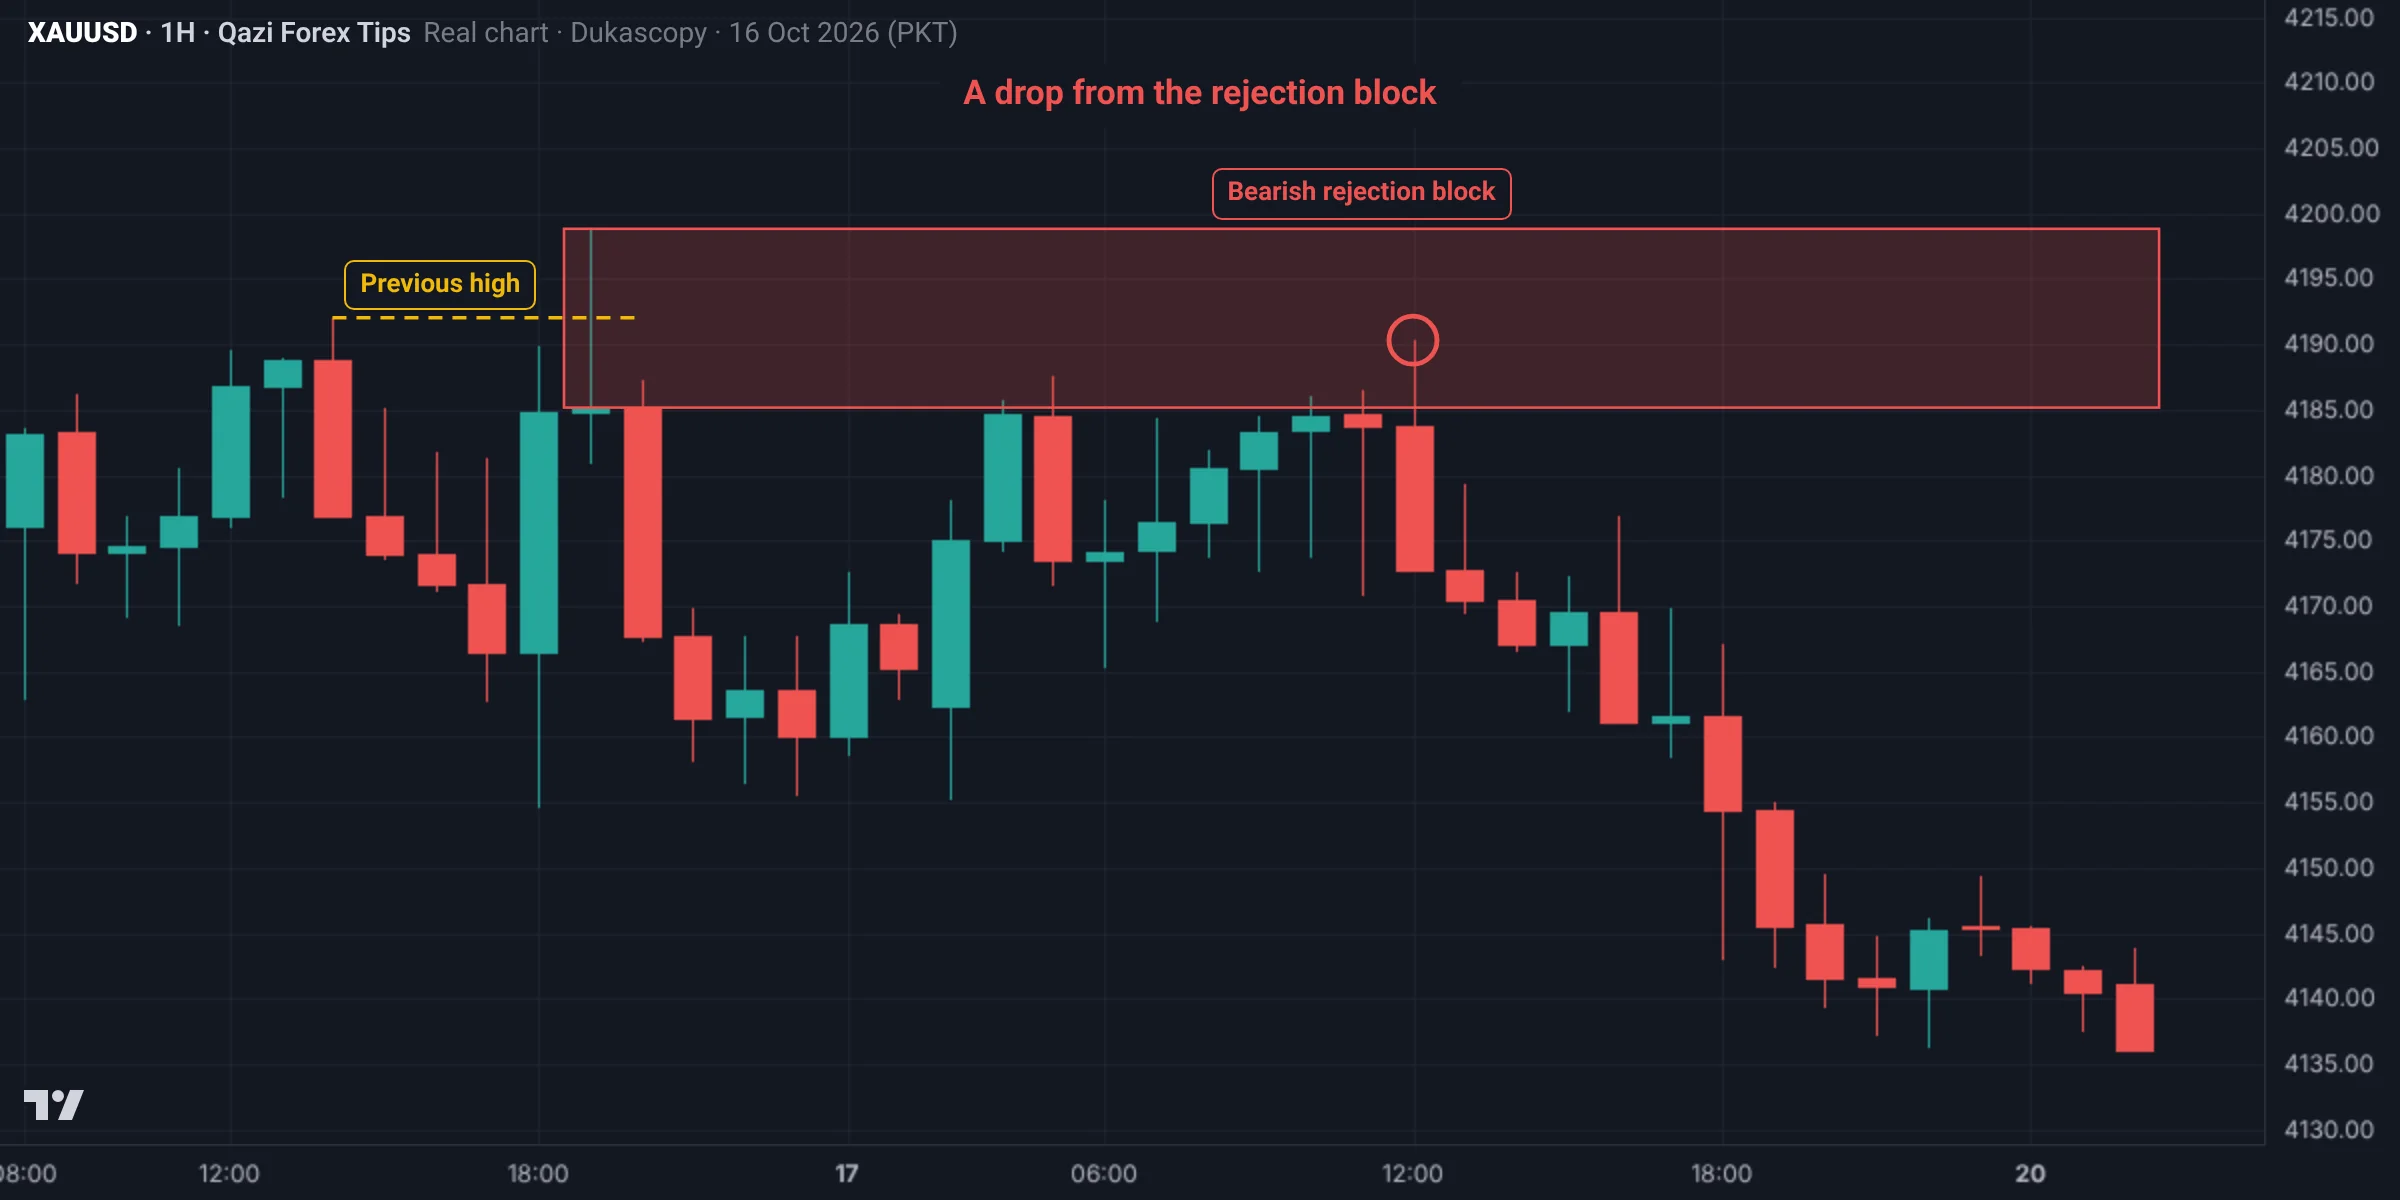
A (19:00 on 16 Oct) went above the previous high at 4,192.0 to 4,198.8 but closed at 4,185.2: a long upper wick. The zone runs 4,185.2 to 4,198.8. At 12:00 on 19 Oct price came back into it at 4,190.3 and then fell to 4,136.0. B is a big green candle, C an ordinary high and D part of the drop.
The marked chart
Test yourself: Lesson 3.5 quiz
8 questions. Pick one answer for each and you will see at once whether it is right and why. Your score and grade appear at the end. You need 70% to pass.
0 correct · 0 / 8
Question 1How does a bearish rejection block form?
Price went up, took the liquidity, but was not allowed to stay.
Question 2When does a rejection block fail?
Keep the stop beyond the wick tip, not inside the wick.
Question 3What does it mean when two or three long wicks form at the same place?
With several wicks, use the highest one for the zone.
Question 4How long must the wick be, at least, for a rejection block?
The wick must go beyond clear liquidity; wicks mid-range mean little.
Question 5What is a propulsion block?
Next time price often turns from the propulsion block without reaching the original order block.
Question 6What is a propulsion block a sign of?
It is smaller and higher than the original order block, so the stop is smaller and RR better.
Question 7If a body closes below the propulsion block's 50%?
The propulsion block is a continuation tool with the bias, not a reversal tool.
Question 8Gold M15: PDH 4,137, a candle hits 4,149 but closes 4,138. In New York price returns to 4,142 and an M1 CHoCH forms down. The trade?
Bearish rejection block 4,138 to 4,149; 10 dollars risk for 23, about 1:2.3.
Lesson checklist
Tick each point once you understand it. Your ticks are saved in this browser.
Assignment
- Find 5 rejection blocks around PDH and PDL on Gold M15.
- See how many reacted later and how many failed.
- Find 3 propulsion blocks on H1 and check whether price reached the original order block.
- Write a full trade plan for one example.
- Post your chart in the group.
Post your assignment screenshots with your reasons in our free Facebook group, where your charts will be checked.
Join the free group
Who wrote this lesson
Dr. Qazi Abdul Basit, Ph.D
Ph.D in Business Administration and a forex and Gold trader since 2013. Founder of Qazi Forex Tips, which teaches traders in Pakistan and India price action, risk management and trading psychology in their own language: 65 student batches so far, free courses on YouTube, and MT5 tools for traders (QFT Replay Simulator, QFT Trade Assistant).
- 2013 trading since
- 75K+ Facebook group members
- 65 student batches
- 15K+ YouTube subscribers
How this lesson was made: the content follows Dr. Qazi's teaching method and years of trading. Real charts are built from Dukascopy Gold (XAUUSD) data, and backtest results are shown as they came out, even when negative. We do not sell signals, manage accounts or take money from any broker. Last updated: 19 November 2026.
Questions
What is a rejection block?
A zone of long wicks that swept liquidity, which later acts as support or resistance.
When does a rejection block fail?
When a candle closes its body beyond the wick tip.
What is a propulsion block?
A candle that trades into an order block and propels the next move; a continuation zone.
What is a bullish rejection block?
A zone of long lower wicks at a low that took the liquidity below and was rejected. It runs from the wick tip to the bottom of the body and acts as support on a return.
What is the difference between a rejection block and an order block?
An order block is a whole candle (the last opposite candle before a BOS); a rejection block is only the wick area that took liquidity and was rejected.
Read more
Education only, not financial advice. Trading forex, Gold and CFDs carries a high risk of loss. SMC concepts describe tendencies, not guarantees. Lesson 21 of 38.